Tuesday 30 April 2019

May all your wishes come true...

Hello everyone,

I'm whooshing by today with probably one of my own personal top 5 favourite cards!

...you know how sometimes you make a card and it just brings you joy?

This card is one of a set of three made for 
Making Cards magazine
and it was so loved by one very special friend that she now owns it!

Ingredients (from Dies To Die For)

Here's how I made this card...

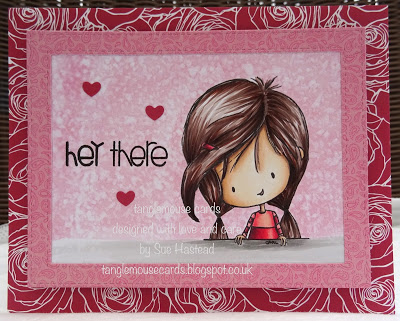
1.Create an 11.5cm x 14.5cm card blank with the fold at the side.  Create a square of design paper the same size and fix it to the card blank.  Set aside

2. With the largest rectangle die from the Card Builders die set cut a piece of card suitable for Distress Ink Blending. Blend Scattered Straw Distress Oxide in the centre of the card blending it outwards, fading it out towards the edges of the card.  Flick water over the design and allow to dry.  Mix some Perfect Pearls powder with a little water and flick that over the design too.  Allow to dry. Fix the card design to the card blank set aside earlier.

3.Stamp the Curvy Girl image on to alcohol marker card with black ink and cut it out with the matching die.  Colour with alcohol markers as shown, adding Wink of Stella to the flowers.  Fix the coloured image to the card design, slightly left of centre as shown.

4.With Archival Ink stamp the sentiment to the right of the image as shown.

Other Ingredients
Copic Markers - 
Skin - E93, E11, E00, E000
Hair - E41, E44, E47
Turquoise - BG49, BG15, BG13
Blue, B39, B06, B02
Peach - YR02, YR01, YR00
Green - G46, G43, YG03
Scattered Straw Distress Oxide Ink Pad
Card Suitable for Distress Ink Blending (I used Strathmore Bristol Vellum Surface)
Card Suitable for Alcohol Markers (I used Make It Colour Blending Card by Elaine Hughes)
Perfect Pearls Powder in Perfect Pearl
Clear Wink of Stella Pen
Archival Ink in Watering Can
Be sure to have a look around our
to see the gorgeous DT creations there and then to 
to engage in some essential retail therapy!

You can buy the May issue of Making Cards Magazine by following the link
HERE
The magazine is full of wonderful inspiration and has some gorgeous freebies!

Thank you for popping by,
happy creating!
from Sue...xxx

Saturday 27 April 2019

Dinosaur Friends...

Hello everyone,
Hope you all have some nice plans for the weekend!

I'm here today with a fab
card that was published recently in
Making Cards magazine!  
I was lucky enough to have the card featured along with two of my lovely Whimsy Creative Team teamies.

I made the card with the super 
Dinosaur Friends Clear Stamp Set by Chrissy Armstrong
with Denise Lynn's gorgeous digi paper set
Dino Friends 
Here's how I made this card!

1. Create a 12.5cm x 14cm card blank with the fold at the side.  Create a rectangle of design paper the same size and fix it to the card blank.  Set aside. 

2.With the Hand Stitched rectangle die cut a piece of card suitable for alcohol markers.  With grey Ink stamp the image onto the centre of the card and colour with alcohol markers as shown.  Place the card back into the metal die and distress it with Tumbled Glass Distress Ink.  With Archival ink stamp the sentiment next to the dinosaur as show.  Set aside

3.With a small stitched banner die  cut two pieces of design paper and a strip of vellum.  Emboss the vellum with a circles embossing folder,  Staple all three strips together as shown.  Set aside 

4.Fix the coloured image to the centre of the card design set aside earlier and fix the stapled strips along the bottom of the card design as shown.

Thank you for popping by!

Be sure to pop to 
to see the gorgeous DT creations there and then to 
to engage in some essential retail therapy!
from Sue...xxx

Dinosaur Friends Clear Stamps Hand Stitched Nested Rectangles
Dino Friends - Digital Papers
Distress Ink Mini Pad - Tumbled Glass
If you want to see the whole feature and read about the cards the Whimsy Creative Team made then you can still buy March's issue of Making Cards magazine by following the link

and finally and very importantly...you can still enter our Whimsy Stamps April Challenge!  Click on the banner to follow the link!


Friday 26 April 2019

Gnomie Secret...

Happy Fri-Yay friends!

I'm here to day with a card made with a beautiful new stamp from

I stamped these gorgeous two in 
 Black MFT Hybrid Ink
and coloured them with Card d'Ache Pablo pencils.

I used the  
Gnomes With a Secret Matching Die 
to cut the out and put them to one side while I made the background.

I cut a rectangle of Smooth Strathmore Bristol Vellum Board and blended
Cracked Pistachio and Broken China Distress Oxide over it.

I then stamped and heat embossed the 
Stamping Bella - Gnome Backdrop 
onto the blended background

I fixed the gnomes to the background with foam.

I used a spare piece of card blended with Wilted Violet Distress Oxide from another project and used the 
Stamping Bella - Happy Dies 
to create the happy sentiment.

Finally I stamped a sentiment from the 
Stamping Bella Birthday Sentiment Set
onto white card and cut out the word birthday.

I fixed the sentiments to the card as shown 


Ingredients from
Dies To Die For
Extreme Black MFT Hybrid Ink
Stamps - Stamping Bella - Gnomes With A Secret
Stamping Bella - Gnome Backdrop 
Stamping Bella Birthday Sentiment Set
Dies - Gnomes With a Secret Matching Die
Stamping Bella - Happy Dies 


Be sure to have a look around our
to see the gorgeous DT creations there and then to 
to engage in some essential retail therapy!

Thank you for popping by,
happy creating!
from Sue...xxx


Monday 15 April 2019

Who's in love with heat embossing?...

ME!!!

Yep you read it here, I might have fallen more than a little in love with heat embossing!

The special 
and
event is still happening!

Go to my blog post 
for all the details!

This card was so quick and easy to make and quite effective I thought!

I used 
to die cut a piece of Kraft card.

Using the brilliant 
and 
WOW Vanilla White Embossing Powder
I heat embossed the beautiful
Lilac and Butterfly Rubber Stamp.

I then tore a strip of vellum and embossed it with the Friendship sentiment from
Everyday Scripted Sentiments Clear Stamp Set

I fixed the vellum to the card as shown along with some sequins, similar to 
Morning Glow Sequins.

I fixed the sequins to the card with 
Star Dust Stickles

The second card I have to show you today was equally as straightforward to make!


To make this card I used the largest square from the 
Notched Squares Die Set
to create a card blank.

I then used the next size down to cut a piece of white card.

Using the
Using the brilliant 
and 
WOW Mayan Glintz Embossing Powder
I heat embossed the beautiful
Seashells Background Rubber Cling Stamp
onto the white card.

I die cut the shells from the 
Kinetic Straight Waves Die Set 
and the friend word from the 
Friend Word and Shadow Die Set,
I also heat embossed these with
and 
WOW Mayan Glintz Embossing Powder

I die cut a piece of vellum with the waves from 
Kinetic Straight Waves Die Set 
and assembled the card as shown.

Finally I added some clear droplets.

Thank you for popping by today!

Please follow the link 
to join in with the special Whimsy Stamps and WOW special event!

from Sue...xxx


Friday 12 April 2019

Whimsy Stamps and WOW...

Hey friends, today certainly is a happy Fri-Yay!

I am here with a really exciting event -
a joint blog hop with wonderful
and 

...and I have to say, I had way too much fun playing with some gorgeous 
and 
goodies!

I made quite a few cards and I'll be showing them all to you over the next few days!


I made my first card by die cutting a 
card blank and card design background.

I heat embossed the circle with the 
using
the brilliant 
and 
Opaque Bright White Embossing Powder
I fixed this to the card blank and set it aside.

Next I used
and 
Opaque Bright White Embossing Powder
to heat emboss the 
Beaucoup Bouquet Clear Stamps 
on vellum.

The flowers were cut out with the matching
Beaucoup Bouquet Die Set

I coloured the reverse of the flowers with Copics, R35, RV95, Y38, YG67 and fixed them to the card design as shown.

I added a 
Special Large Word Die cut
and stamped the memories sentiment from the 
You're My Jolly Clear Stamp Set 
onto a 
Quick Strips Die cut.

This card is made by blending distress inks in
 Scattered Straw, Evergreen Bough and Shaded Lilac on card and then die cutting it with a Notched Square Die

I then heat embossed the image with the 
using the brilliant 
and 

I then added a die cut 
and stamped the forever sentiment from
with black ink, die cutting it with a

Prizes - No blog hop is complete without a prize!

WOW! Embossing Powders has 6 powders of your choosing along with a WOW carry case to store your powders in.

Whimsy Stamps is giving away a $25 gift certificate to their store.

Winners will be chosen at random in the week of 22nd April from the comments left on all the blog posts.

To join this giveaway you must leave a comment on each blog post to have a chance at winning a prize!

This hop is open internationally!

Blog Hop Line Up


Tuesday 9 April 2019

So long, farewell auf wiedersehen, adieu...

Hello everyone, 

Today's post is one of mixed emotions for me.

It is my last post at Copic Marker Europe which feels a little sad but when I look back over my two years designing there I feel very proud and happy about how far I have come with my Copic colouring! 

I thought I would show you three cards I have made during my time here which according to the viewing figures you all liked the most, followed by the three I enjoyed making the most! 
I wonder if they will be the same? (-;

I will add a link to the original posts just in case you want to look at the tutorial again!

This was such a fun technique involving Copic Various Refills, washing up liquid and a straw! I thought the background was perfect for a mermaid!

This technique used Copic Various Ink Refills with a stencil and some paper towels!

...and the final card that you all really liked is a surprise as this was my first tutorial back in February 2017!
Hey There! - February 2017
This Copic blended background technique remains one of my favourites and is so easy to achieve!

Here are the three cards I like the most and really enjoyed making during my time on this lovely team.

This card was a real challenge but I think that is why I love it so much.  The fur took ages and was quite difficult but I so enjoyed photographing every stage and making the tutorial for you!  

This technique as my absolute favourite and I loved how the background looked when I had finished! That polar bear is cute too!


I agree with you all about this card!  It is one of my favourites too!  

Thank you to Diny, Faye and the lovely Copic Marker Europe team for the fun and friendship during my time there!

Thank you for popping by!

Happy Copic colouring
love from
Sue...xxx