Showing posts with label Tuesday Tutorial. Show all posts

Tuesday, 4 May 2021

Whimsy Stamps - Mermaid Dreams - Tuesday Tutorial

  Hello everyone,

Oh my word - these Tuesdays come round quickly don't they! - I swear time is speeding up! 

Today I'm sharing a sweet, (VERY sweet)! (; tutorial!
I'm going to keep you guessing today so if you don't read ahead you'll have a nice surprise - unless you can guess what I've made! 

If like me you adore Mer-May then Whimsy Stamps has got you covered!!
I decided to try something a little different with two of the fabulous Whimsy Stamps mermaid stamp sets.
and the 
Ingredients from Whimsy Stamps

Other Ingredients
Cling Wrap
Watercolour Card
To create the inky background for my project I used (Watercolour) Sparkle Pens but you could use any sort of watercolour pens or watercolour medium for this technique. 
Black Stazon Ink
Mini Mister or Spray Bottle
Precision Scissors
Cocktail Sticks
Glue (I used a cold glue gun) 
First I placed a piece of cling wrap on my glass mat and scribbled and dotted some inks in blue, turquoise and pink onto it.
I then sprayed water onto a piece of A4 watercolour card.
I then placed the inky cling wrap onto the card, pressed it down and scrunched it up slightly.
I took the cling wrap away and this was the effect...
I repeated this with a different selection of mermaid type colours!
I ended up with two inky deliciously inky backgrounds.
Then I randomly cut the card up into about odd shaped pieces - don't overthink this, just dive in with the scissors, random is best!  I cut the card into about eight pieces in total.
I then stamped the mermaid tail from the Mermaid Dreams  stamp set onto the inky card.
I use Stazon Ink for this as it works best on top of watercolours.  It doesn't bleed and it leaves a crisp outline.
I stamped six tails in total and the gorgeous mermaid from the Lets Be Mermaids stamp set.  (You can see I also stamped the seashells but I decided not to use them this time)
I then fussy cut the mermaid tails (not my favourite part but I'm getting better at it - (I'm a bit of a muppet because I have a Scan n Cut - I'm just too lazy to get it out and set it up)!
Make sure you keep all the off cuts - you will need them later!
I coloured the mermaid with Copic Markers
Hair - E47, E39, YR27, YR24, YR21
Skin - R20, E04, E11, E00, E000
Tail - B39, BG07, BG15, BG01, BG11, YG00, White Gel Pen
I then fussy cut her...
Here's where you need the offcuts I said to save earlier! - I used the smallest and second smallest dies from the Wavy Nested Frames Die Set to cut shapes from the tail offcuts.
I then stamped a selection of sentiments from the Mermaid Dreams and Lets Be Mermaids stamp sets onto them (again with Stazon Ink)
Here is my lovely selection of tails, sentiments and a mermaid!
I used a glue gun to fix a cocktail stick to the back of each shape.  (You could use PVA but I'm impatient and I used the glue gun because it dries so quickly)!
...so, if you have n't already read ahead, can you guess what these are for! (;  ...

...well I did say it was a sweet tutorial! (:

I had a bit of a time deciding which stamp set to use for the cupcakes!  I uuuummed and aaaaaahed over using...  
Unicorn Wishes Clear Stamps - Whimsy Stamps 
or
Over the Moon Clear Stamps - Whimsy Stamps

...and I already have a few more ideas up my sleeve for halloween! (;

Thank you so much for popping by today!  I hope you've enjoyed my tutorial, it would be great to see your projects so remember to share them with us!

look after yourselves and those you love!

Happy creating from Sue...xxx

Mermaid Dreams Clear Stamps - Whimsy Stamps Let's Be Mermaids Clear Stamps - Whimsy Stamps Wavy Nested Frames Die Set - Whimsy Stamps


Please note that in order to assist with the running of this blog I do use affiliate links from time to time and there may be some in this post, denoted with a *.  You can use these links at no cost whatsoever to yourself. 
I only work with products I love and my opinions are my own.

Tuesday, 30 March 2021

Whimsy Stamps - Coffee Lovers Tuesday Tutorial...

 Hello everyone...

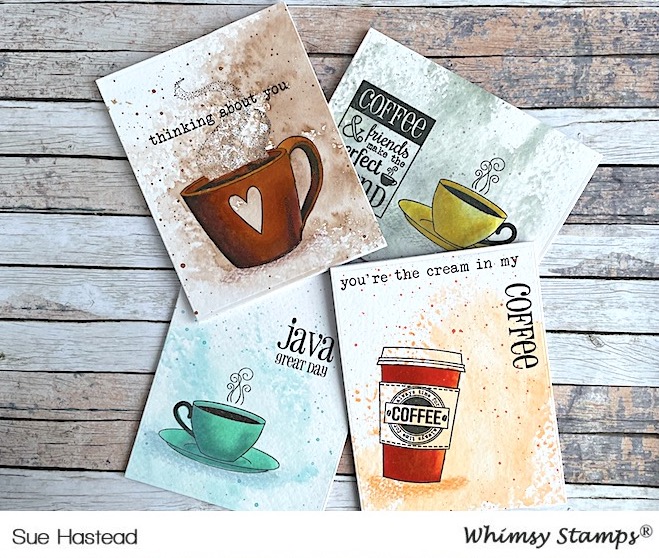
I'm here today with a set of 'one layer' coffee themed cards I designed as a gift for a coffee loving friend.  I have also made a little card pouch to put them in.

I thought that the coffee themed stamps by Whimsy Stamps were perfect for this project!
This tutorial shows how I made the cards including straightforward masking techniques which don't involve lots of fussy cutting! (Which I personally find tedious and am terrible at)!

I have used Copics to colour over Distress Inks.  As the inks are water based it is totally safe to do this but please do your own swatch tests first if you aren't sure!  I also coloured onto watercolour card, the card soaks up a lot of ink and I love the effect it gives - you can really lay down a lot of ink and I love that!
I dabbed the Tumbled Glass ink pad onto my glass mat and sprayed it with water.
...then I pressed water colour card onto the wet ink and swooshed the card about a bit until I was happy with the result.
I repeated this with the other three colours, Tumbled Glass, Dried Marigold, Pumice Stone and Ground Expresso.
I cut the cards into rectangles measuring 9cm x 11.5cm
I then stamped the coffee themed stamps Hot Sip and Coffee Break onto the inky backgrounds with black ink.
 
I placed acetate over my design to 'test stamp' the add ons to make sure they were in the correct position.
I then coloured each image with Copic Markers - E18, E17, YR27, YR14
...BG57, BG34, BG11
...R27, R05, R02
Y26, Y15, Y11
Next I mixed up a strongish wash of each ink (using the same ink I had used for the background except for this card where I chose the darker ink - Hickory Smoke).  I scrunched up a piece of kitchen towel to cover the coffee cup up and splattered the ink over the design with a fan brush which gives a really fine effect of small dots instead of splodges!
I stamped a sentiment from the Coffee Time Set onto each card in black ink.
I was really happy with how these turned out!
I could get used to making one layer cards - they look so stylish!

I decided to make a little wallet for the cards thinking that they make such a lovely little gift for a coffee loving friend.
This card holder is a doddle to make and was inspired by a visit to Pinterest!
All you have to do is score a piece of A4 card in half vertically and horizontally and burnish the folds with a bone folder tool.
Then mark the folds and cut as shown above.
No glue is required, the card just folds up into a little wallet!
Finally I added some ribbon and a tag...
Ingredients from Whimsy Stamps
I used a tag die which is retired by Whimsy Stamps - I'm sorry about that!  However, you could use the fabulous 
Bookmark and Tags Die Set* instead by cutting the long bookmark die shorter to fit the stamped sentiment.

Thank you so much for popping by today!
I hope life is treating you well.
Look after yourselves and those you love
from Sue...xxx


Hot Sip Rubber Cling Stamp - Whimsy Stamps Coffee Break Clear Stamps - Whimsy Stamps 
Bookmark and Tags Die Set - Whimsy Stamps

Other Ingredients
Distress Inks* in Dried Marigold, Tumbled Glass, Pumice Stone, Hickory Smoke, Ground Expresso
Rectangle Layering Dies by Tonic Studios
Paint Brush
Copic Markers - 
Browns - E18, E17, YR27, YR14
Reds - R27, R05, R02
Yellows - Y26, Y15, Y11
Blues - BG57, BG34, BG11
Kraft Card
Brown Ribbon and Twine


In order to assist with the running of this blog I do use affiliate links from time to time and there may be some in this post, denoted with a *.  
I only work with products I love and my opinions are all my own.
Please see my About Me page for more information.