Showing posts with label MFT Papers. Show all posts

Saturday, 29 April 2023

Stamping Bella - Spring/Summer Release Showcase. (Curvy Girl Plays Tennis & Summer Bundle Girl With Beach Ball)

Happy Saturday friends,
I hope you're having a lovely day!
We have blue skies and sunshine for the first time in weeks! - just in time for May Day Bank Holiday!

I'm here today as a Stamping Bella Guestabella to show you some cards from the recent Spring/Summer release.

Elaineabella and the lovely Bella's are having a showcase weekend and I am happily and proudly joining in! - Thank you so much to the Bella's for having me! (:

Ingredients from Stamping Bella
(Uk friends you can purchase these goodies from Dies To Die For)

Ingredients from Dies To Die For

Skin E04, E11, E00, E000
Hair E47, E44, E43
Blues B39, B06, B02
Blue/Greens BG49, BG15, BG13
Greens YG17, YG03, YG01

Ingredients from Stamping Bella
(Uk friends you can purchase these goodies from Dies To Die For)

Ingredients from Dies To Die For

Skin E04, E11, E00, E000
Purples BV08, V17, BV11, BV31
Blue/Greens BG49, BG15, BG13
White/Grey BV31, BV11
Puppy W2, W0, BV31

Thank you for popping by today!

Hope you all have a smashing weekend!

from Sue...xxx 


Friday, 7 April 2023

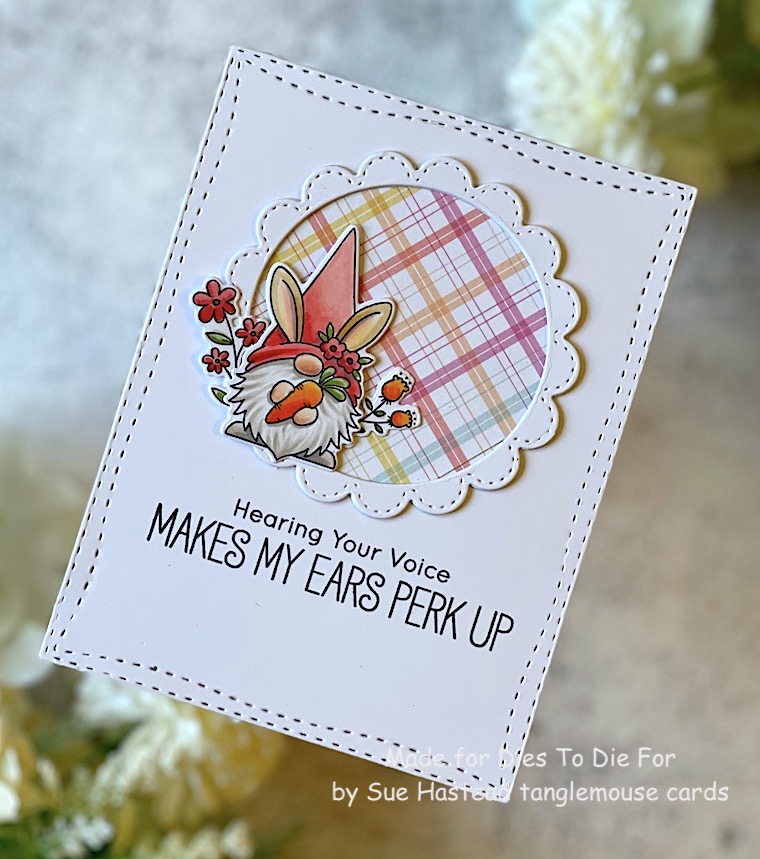
My Favorite Things - Spring Gnomes from Dies To Die For

 Hello friends ...

Gosh - it has been a while!

I have still been creating but just not at such a fast pace as previously.

Today I'm showing you a gorgeous Easter/Spring card made with
from our lovely 

Friends who are Worldwide/Stateside, you can buy the goodies to make this card from 
and 

I coloured this cutie ages ago and did n't make a note of the Copic Markers*  I used, I think they are based around...
Skin E04, E11, E00
Ears E04, E11, E43, E42
Beard W4, W2, W0
Oranges - YR09, YR02
Pinks/Reds - R35, R32

I hope you are keeping well and you have a happy and restful Easter weekend with the people you love.

from Sue...xxx


Thursday, 22 November 2018

Cool Christmas...

Hello Friends!

Well, I don't now about you but I have given up pretending that I'm not fussed with Christmas because truth is I am having such a lovely time making Christmas cards! /-:

In fact I'm having such a fab time that today I have made two!
Ingredients from Dies To Die For
*(Currently out of stock but there are lots of other gorgeous Christmas papers you could use)
To make this card I stamped and masked the image and first created the background with Distress Oxides
Chipped Sapphire, Peacock Feathers, Cracked Pistachio 
The image is coloured with Copics and Polychromos
Car - BV23, BV20, Dark Indigo and Black
Snowmen - Cold Grey iv
Hats and scarves are a selection of reds, greens, purples
The snow is a white Signo Uniball Gel Pen
This tag/card is coloured with Polychromos - I didn't note the colours but it is a simple selection of reds, greens, purples
The snow is a  white Signo Uniball Gel Pen
Finally I added a red velvet bow with silver bells - pure Christmas indulgence! (:


Be sure to have a look around our 
to see the gorgeous DT creations there and pop to then to 
to engage in some essential retail therapy!

Thank you for popping by,
Happy creating! 

love from
Sue...xxx


Thursday, 7 June 2018

Happy Birthday...

Happy Thursday lovely friends,

I'm here today with some more 
gorgeousness!
Other Ingredients
Make It Colour Blending Card by Elaine Hughes Marker Geek
Copic Markers - Skin BV20, E21, E00, E000 
Hair E51, E53, E55 
Frock, BG57, BG53, BG11, T3, RV95, RV93, RV91, RV000
Cake as above

Have fun everyone!
Thank you for popping by!
Happy creating
love from
Sue...xxx

Don't forget to pop straight to the Dies To Die For inspiration blog to look at the lovely DT creations there, and then straight to Dies To Die For for some essential retail therapy!
This card is one of a set of three I made for a past issue of Simply Cards and Papercraft
The magazine is available 


Thursday, 17 May 2018

I Miss You...

Hello everyone,
Happy Thursday!

I'm here today with something a little different made with some super goodies from 
Dies To Die For
Ingredients From Dies To Die For
Your Next Stamp - Crystal Clear and Sparkle Gumdrops

Other Ingredients
Tonic Studios Circular Dies
Vellum
Glossy Photo Paper (I used Canon)
Tim Holtz Distress Ink Pads in Peeled Paint, Mermaid lagoon, Cracked Pistachio and Peacock Feathers.
Water Spritzer

Wet Wipe
Make It Colour Blending Card by Elaine Hughes - Marker Geek
Alcohol Markers (I used Copics BG11, BG10, BG0000)

This card was featured in April's issue of Making Cards Magazine, you can still buy this magazine by following the link 
HERE

Here is a quick description of how I made this card, including the lovely effect of Distress Inks on Glossy photo paper to make the leaves...

1.Using 14cm circular die create a card blank with the fold at the top.  With the same die cut a circle of striped design paper and fix it to the card blank. 

2.Using the 14cm and 12cm circular dies together and polka dot paper die cut a circular frame.  Fix this to the card design.  

3.Using the 10cm circular Die cut a piece of vellum.  Emboss this with the Raindrops embossing folder and set aside.

4.Dab the Distress Inks onto a glass mat to create a colour palette and spritz with water.  Tap the glossy paper, gloss side down onto the inks.  It will take several attempts to completely cover the glossy paper and it is important to dry the ink between each application either naturally, which doesn’t take too long or with a heat gun.  (Do not hold the heat gun too close or you will melt the paper)!!!  Keep turning the card and applying ink until you have a design you are happy with.  When the inks are completely dry, wipe the glossy paper with a baby wipe – this gives a lovely shiny and polished effect.

5.Die cut the glossy design paper with the Fab Foliage die and set aside.  Die cut white card with the ‘you’ sentiment and colour with a alcohol markers in an ombre effect as shown.

6.Firmly fix the vellum, the sentiment and the foliage to the card design set aside earlier as shown.


7. With black ink stamp the I Miss sentiment onto white card, cut the words out individually and fix to the card design a shown along with some sparkly gumdrops. 
Have fun everyone!

Thank you for popping by!
Happy creating
love from
Sue...xxx

Don't forget to pop straight to 
for some essential retail therapy!