Thursday 27 July 2017

Witch way is the Candy

Hello everyone.

Surprise Surprise!

Betchya weren't expecting to see a fabulous new holiday release from

I have been lucky enough to have the new release stamp
to create something with to hopefully inspire you!

I LOVE this stamp - the possibilities for making something scrummy are endless!

I have made two projects for you...

Witches in a whizz! Who knew!?
Ingredients
DoveArt Studios Trees Silhouette 
Impression Obsession Six Witches Die Set (Dies To Die For)
MFT Die namics Scalloped Stitched Frame (Dies To Die For)
Cheery Lynn Bat Family Die Set
Black Organza Ribbon
Authentique Thrilling 6 x 6 Paper pad (Dies To Die For)
Tim Holtz Distress Inks in Antique Linen, Victorian Velvet, Seedless Preserves, Chipped Sapphire and Peacock Feathers
Sentiment made on Computer

I really love this one!
Ingredients
DoveArt Studios Trees Silhouette 
Deer Silhouette Stamp by Alesa Baker Designs for Impression Obsession
Versafine Ink in Onyx Black
Black Cardstock
Fran-tage Chunky White Embossing Enamel by Stampendous
Tim Holtz Distress Ink Pads in Tumbled Glass, Broken China, Chipped Sapphire Black Soot and Weathered Wood 
Lawn Fawn Winter Big Scripty Words Stamp and Die Set.
Archival Ink in Cobalt
Ribbon

Thank you for popping by!
Remember to go and have a look at the other gorgeous new releases from my lovely DT friends at 
DoveArt Studios

from Sue...xxx

Sunday 23 July 2017

An A-maze-ing Birthday...

Good Morning everyone, Happy Sunday!

Sue here today, little later than planned but sssshhhhh... our secret!  Don't tell anyone!

Reason for lateness is that we have had several days of fun celebrating my youngest son's 21st Birthday!

I could n't wait any longer to share with you the card that I made for him.
Dies - MFT Die namics - Vertical Stitched Strips
Circle shaker window and frame - My Favorite Things
Your Next Stamp Stitched Banner 
Memory Box Upper Case Alphabet Soup
Lawn Fawn - Lawn Cuts - Small Stitched Rectangle Stackables
Paper - Carte Bella Rough & Tumble 6x6 
Embellishments - Maze shapes (white) - My Favorite Things
Maze spheres - My Favorite Things
Shaker pouches - My Favorite Things
Your Next Stamp Circus Fun Matt Gumdrops
Thank you for popping by
Happy Crafting!

love from Sue...xxx

Don't forget to pop straight to the Dies To Die For inspiration blog to look at the lovely DT creations there, and then straight to Dies To Die For for some essential retail therapy!

Monday 10 July 2017

Mermaid madness...

Good Morning everyone...
I'm here today with a tutorial for 
Copic Marker Europe
to show you a few ideas for creating a mermaid card.

Sandie Dunn did a beautiful tutorial at Copic Marker Europe on Wednesday which showed how to colour an underwater scene with Copic Markers.

Today I am going to show you how to use a Copic Airbrush System to create the sea, and how to use Copic refills, mirror card and die cuts to create bubbles.

I enjoyed this so much and I hope you do to!
Here are the ingredients I used to make my card.  The Copics for the sea are Copic Markers BG13, B24, RV17, B29 and the Copic Refills for the bubbles are BV08, YG95, Y17 and Colourless Blender.
First, I dropped a few spots of Copic Refills BV08, YG95, Y17 and Colourless Blender close together on a glass mat. 
Then I pressed a piece of silver Mirrored card onto the ink - you need to work swiftly here as the refills dry quite quickly, also, don't move the card around, just press it onto the inks and lift it off.
The effect of the refills on the mirror card will look something like this.  (I love this so much I am already thinking that this effect will look great for snow and snowflakes)!
Using Memory Box Small Ringlets and Circle Dies I die cut cut the mirrored card.
I love how you can see the purple and gold marbling on the die cuts. 
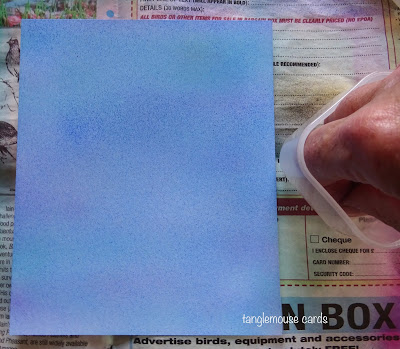
 Next, to make the sea, I used the airbrush to colour a piece of card.
I used the chisel nib of the Copic Markers and sprayed the colours in the order BG24, B13 and RV19.  Comic Airbrushing is very straightforward if you remember to spray slowly and steadily.  (....and remember to cover your work surface with paper - this is especially important because the ink goes a long way)!
Finally, I sprayed the card with B29 using the brush nib of the Copic Marker.  When you use the brush nib in an airbrush the effect is like a fine ink splatter. 
Next, to create a watery effect in the sea I first tipped some Colourless Blender into a pot. 
Then, I completely dipped my fingers into the colourless blender,
...and flicked the blender onto the card, I did this a few times until the blue sea was covered in lots of different sized droplets.
I thought these two techniques were really good fun! 
It would be great if you could try this and show your cards to us at 
Copic Marker Europe on Facebook.
To find us just follow the link
I finished my card by colouring a mermaid from the gorgeous MFT set - Mermazing, and adding a sentiment from the MFT set - You're A-maze-ing.  I added a Die namics Stitched Rounded Rectangle Frame.  All these products are available from
Copic Markers Used
Skin - E04, E01, YR000, YR0000
Hair, YR24, YR23, E99
Mermaid Tail - BV08, V17, V15, 
Gold Star - Y19, Y15, Y11
Clown Fish - YR09, YR04, YR02
Thank you for popping by.
happy Copic Colouring...
from Sue ...xxx


Sunday 9 July 2017

Fairy Happy...

Happy Sunday everyone!
I'm here today with a sweet fairy friend.
Inks Used - 
Copic Markers - 
Skin, E04, E21, E00, E000
Hair, E42, E43, E44, E47
Reds, R59, R45, R24
Greens, YG67, YG25, YG03
Wings, R00 and Colourless Blender
Thank you for popping by
Happy Crafting!

love from Sue...xxx


Don't forget to pop straight to the Dies To Die For inspiration blog to look at the lovely DT creations there, and then straight to Dies To Die For for some essential retail therapy!

Friday 7 July 2017

Not such a bad dog...

Good morning everyone,

I'm here today with some Bad Doggy cuteness!

I don't know about you but I could n't be cross with him for too long!
This gorgeous stamp is available to buy by from CC Designs - DoveArt Studios 
by  following the link
HERE
or if you are in the UK, from Dies To Die For
by following the link 
HERE
Inks Used -
Copic Markers 
Bad Doggy - E79, E77, E74, E71
Raggedy Hat - RV56, RV34, RV32, RV11
Grass - YG97, YG67, YG25, YG03
Other Ingredients
Make it Colour Blending Card by Elaine Hughes (Marker Geek)
Memento Ink Pad in Black
Crafters Companion Desert Storm Kraft Card
Marianne Designs Paw Prints Embossing Folder (DF3411)
My Minds Eye 6x6 Paper pad - Unforgettable
Ranger Glossy Accents
Cosmic Shimmer Acrylic Glue

Thank you for popping by
Happy Creating
love from Sue...xxx