Showing posts with label Copic Refills. Show all posts

Tuesday, 9 April 2019

So long, farewell auf wiedersehen, adieu...

Hello everyone, 

Today's post is one of mixed emotions for me.

It is my last post at Copic Marker Europe which feels a little sad but when I look back over my two years designing there I feel very proud and happy about how far I have come with my Copic colouring! 

I thought I would show you three cards I have made during my time here which according to the viewing figures you all liked the most, followed by the three I enjoyed making the most! 
I wonder if they will be the same? (-;

I will add a link to the original posts just in case you want to look at the tutorial again!

This was such a fun technique involving Copic Various Refills, washing up liquid and a straw! I thought the background was perfect for a mermaid!

This technique used Copic Various Ink Refills with a stencil and some paper towels!

...and the final card that you all really liked is a surprise as this was my first tutorial back in February 2017!
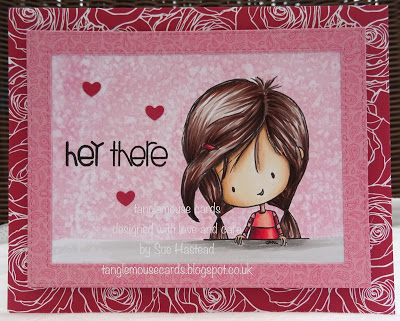
Hey There! - February 2017
This Copic blended background technique remains one of my favourites and is so easy to achieve!

Here are the three cards I like the most and really enjoyed making during my time on this lovely team.

This card was a real challenge but I think that is why I love it so much.  The fur took ages and was quite difficult but I so enjoyed photographing every stage and making the tutorial for you!  

This technique as my absolute favourite and I loved how the background looked when I had finished! That polar bear is cute too!


I agree with you all about this card!  It is one of my favourites too!  

Thank you to Diny, Faye and the lovely Copic Marker Europe team for the fun and friendship during my time there!

Thank you for popping by!

Happy Copic colouring
love from
Sue...xxx


Saturday, 9 March 2019

Watercolour painting with Copics!...

Hello everyone!

I'm here today with a really easy and pretty technique.

I'm going to show you how to paint with your Copics as if they were watercolours!
I am using a beautiful stamp from Stamping Bella - 
Uptown Girl Melanie - The Modern Bride, a paint palette, a paintbrush, Copic Various Ink Refills E00, YR21, YG63, BV08, BG23, B60 and Colourless Blender.  I also kept a piece of paper towel handy for wiping my paintbrush.

This is such a lovely technique and it is really simple to achieve lovely results.  Here are a few top tips for you!

If you don't have Copic Various Ink Refills you can use Copic Markers by scribbling them onto an acrylic block and using a paintbrush dipped in Colourless Blender to pick up the colour.

Copic Colourless Blender will lighten the colours you are using so you might want to choose darker colours than you usually would and practice on a piece of spare card first to see how the colours come out!

Use the smallest brush you are comfortable with and once you have dipped it into the colour and the blender you might need to just lightly dab the tip of the brush onto the paper towel so it isn't too wet. 

Clean your brush each time you have used a different colour and dry it on paper towel.  

Replace the Copic Colourless Blender as it becomes dirty.
 Put a few drops of E00 and Colourless Blender into the paint palette.  Dip the tip of the paintbrush into the E00 and then into the blender and quickly paint the face, starting in the area of the face with the most shade.  You can repeat this if you want to, until you have a depth of colour you are happy with.  Repeat with the shoulders and arm.  Clean the paintbrush with colourless blender and dry on a paper towel.

Put a few drops of YR21 into the paint palette and repeat the same technique with the hair - dip the brush into the YR21 and then the colourless blender and paint the hair, starting in the part of the hair where there is the most shade.
Put a few drops of YG63 into the palette.  Dip the brush into YG63 and then into the colourless blender and dab some spots of green onto the leaves.
Put a few drops of BV08 into the palette.  Dip the brush into the BV08 and then into the colourless blender and paint the flowers.  You can repeat this adding more colour to the petals where you want them to be darkest.
Dip the brush into YG63 again and then into the colourless blender and dab some spots of green onto the centre of the flowers.
Using B60 add some folds to the frock - you only need a light touch here, if the folds look too dark you can smooth them out by painting with some colourless blender. 
Put a few drops of BG23 into the palette.  Dip the brush into the BG23 and then into the colourless blender and paint the ribbon.  You can repeat this adding more colour to the ribbon where you want it to be darkest.
I had nt tried this technique before, I promise it is really easy to do.  It would be great if you could have a go and show us at


Sunday, 9 December 2018

Inky Glittery Trees...

Hello everyone,

I'm going to show you a really simple and effective technique with 
Copic Various Inks (refills), glitter card and some gorgeous products from
Whimsy Stamps

I tried this technique several times until I had found a way to do it which I think gives the best effect!
Here are the things I used:- 
Glitter Card (I used Lawn Fawn Pixie Dust Card)
Whimsy Stamps Snowy Trees by Crissy Armstrong 
(I have made so many cards with this wonderful die set this year - it really is fab)!
MFT Die namics Dies - Stitched Stars
Copic Various Inks - 0 Colourless Blender,
YG63, YG03, YR23, YR21
You will see I die cut the glitter card before applying the inky technique.  I found that if I inked the glitter card first, and then die cut it, the card lost some of its sparkle and it really spoiled the inky finish as it pressed the inks together into one colour.  It gives a much nicer, brighter finish to die cut the glitter card first.

I dabbed some spots of YG63 onto my glass mat
 ...then some YG03
 ...and finally some Colourless Blender - you need to work fast as the ink evaporates and dries quickly!
Then I placed the die cut trees onto the ink, glitter side down and gave them a little wiggle - there's no need to swipe the card through the ink, this technique works fine with just a bit of movement.
You will end up with something like this!
You can see the different shades of green ink on the glitter card - it really does look lovely!
I then repeated the same process with the die cut stars and YR23 and YR21 Various Inks
I am so happy with this technique.  I love glitter card and I use it a lot for my card making.  I am so excited to think I can use my Copic refills to make my own glitter card which will perfectly match my image colour palette!
Here is the card I made with my inky glittery trees and stars...
Ingredients from Whimsy Stamps
Snowy Trees Die Set by Crissy Armstrong
Other Ingredients
300gsm Black Card
Vellum
Stars Embossing Folder

Thank you for popping by, happy Copic colouring, 
from Sue...xxx


Tuesday, 31 July 2018

You Sparkle - Copic Refills on Yupo...

Hello everyone,

I'm here today to show you a really fun Copic technique with Copic Refills on Yupo paper.

The items I have used for this technique are - 
a sheet of Yupo paper, Copic Refills 0 Colourless Blender, Y38 and RV55, a small ball tool and a straw. 
First I randomly squeezed some colourless blender over the Yupo paper.  
Then I added a few pools of Y38...
...followed quickly by some patches of RV55
Then I added some more drops of Colourless Blender...
...and quickly blew the blender and the ink over the paper.
I repeated this a couple of times until the ink had spread and I had an effect I was happy with.
Then I put some drops of Y38, Colourless Blender and RV55 into an ink palette...
...and using the small ball tool I picked up a dot of YR38 and placed the ball tool on the inky design.  You will see that the inks work together and a circle develops with a pale inside and a dark outline.
I repeated this with RV55 and kept applying dots over the inky background until I liked the effect!
This is my final design, I had never tried this before so i was really happy with how it turned out!
I could have just stopped there as this is really pretty!
I decided to make a background for a new stamp by 
Stamping Bella - Oddball Sparkle fairy.
Ingredients from Dies To Die For
Copics - 
Skin - E04, E11, E21, E000
Eyes - B02, B000
Hair - E30, E33, E35, RV21, RV23, RV29
Clothes - RV69, RV66, RV63, E08, YR38, YR09
Wings - C7, C4, C2 and Clear Wink of Stella

I had such fun doing this!  It would be great if you could try this too and show us your cards at
Copic Marker Europe on Facebook.
To find us just follow the link
HERE.


Thank you for popping by.
Happy Copic colouring

from Sue...xxx


Sunday, 24 June 2018

I'm forever blowing bubbles...

Hello everyone!

I'm here today with a technique that uses Copic refills and washing up liquid to create a really fun bubbly background!


The items I have used for this background technique are - 
A piece of Glossy Photo Paper, Copic refills BG15, BG13, FBG2, plastic disposable cups, plastic straws and household washing up liquid.
I put a little bit of Copic refill BG13, a little Copic Colourless Blender and some washing up liquid in a plastic cup.  You need enough washing up liquid to make the refills quite thick and sticky.
Then, I put the straw in the liquid and blew through it to create bubbles!
There are a few things to be careful of at this stage!  Firstly, do not blow too hard or all the liquid will fly up and out of the cup and splash your face - I know this to be true!!! Secondly, please remember to blow through the straw - do not forget and suck the liquid up!
So - blow quite gently and slowly and steadily until you have a cup full of bubbles!
Then I placed a piece of glossy photo paper glossy side down onto the bubbles and pressed down so the bubbles burst on the paper.
Repeat this several times until you are happy with how it looks!
Next is the exciting part when you see the pattern the bubbles have made on the card!
Then I changed colour, and repeated the technique with FBG2
I had far too much fun playing with these bubbles - I think this has become one of my favourite techniques!
                              
I made quite few bubbly backgrounds - I did n't want to waste the Copic Ink so I made some for another time!
The background will dry after a few hours and all the bubbles left on the card will disappear!
There was really only one image I could put with such a fabulous bubbly background - hands up if you are also thinking of mermaids!!!
Ingredients from our lovely Dies To Die For

Other Ingredients
Make It Colour Blending card by Elaine Hughes Marker Geek
Memory Box Small Ringlets Die
Copic Markers - 
Skin - E11, E000, E00
Hair - YR21, E35, E37
Shell - E04, E01, E00
Tail - V17, BV13, B60 (Thank you to lovely Elaine Marker Geek for this mermaid tail colour combo)!
I had such fun doing this!  It would be great if you could try this too and show us your cards at
Copic Marker Europe on Facebook.
To find us just follow the link

Thank you for popping by.
Happy Copic colouring

from Sue...xxx