Showing posts with label Not a card. Show all posts

Sunday, 25 September 2022

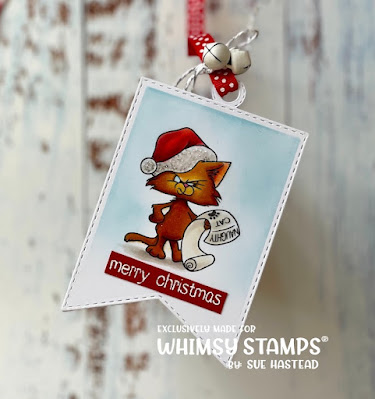
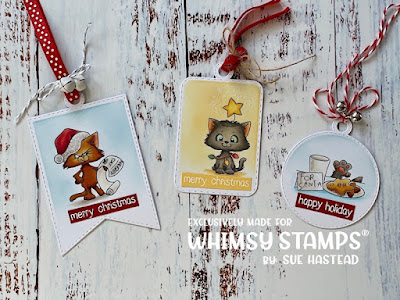
Cat Do Christmas - Whimsy Stamps

 Happy Sunday everyone, 
I hope it's a good one for you all.

Today I have some gift tags to show you made with a fun stamp set from 
Cat Do Christmas Clear Stamps
I cut the backgrounds to each tag twice and sandwiched the circle die from the No See Kinetics Die Set between them to create the tag.  
I really loved making these - it was a great excuse to fiddle with Christmas goodies too!

Thank you for popping by today.
Happy creating!
from Sue...xxx


Ingredients From Dies To Die For

Other Ingredients
WOW Slow Drying Embossing Pad
Cosmic Shimmer True White Detail Embossing Powder
Selection of Ribbons, Bells and Baker's Twine

Background 
Distress Ink
Scattered Straw, Tumbled Glass

Misti Stamp Tool
Gemini Jnr Die Cutting Machine


Please note that to assist with the running of this blog I do use affiliate links from time to time and there may be some in this post, denoted with a *.  You can use these links at no cost whatsoever to yourself. 

I only work with products I love and my opinions are my own.


Here is a single use code for you to use at Whimsy Stamps.

Please enter the store 

HERE

and apply the code

TANGLEMOUSECARDS

at the checkout


Thank you for supporting Whimsy Stamps & tanglemouse cards 


Monday, 28 March 2022

Sew You - Whimsy Stamps

Happy Monday Friends! 

Today's project is something a bit different! 
Ingredients from Whimsy Stamps

Thank you for visiting today!
from Sue...xxx


Other Ingredients
3 inch Embroidery Hoop
DecoArt Chalk Paint and Crackle Glaze
Cheesecloth
Wooden Button
Paper Flowers
Distress Oxide Ink Pad in Pumice Stone
Memento Ink Pad in Expresso Truffle
Collall 3D Glue

Please note that in order to assist with the running of this blog I do use affiliate links from time to time and there may be some in this post, denoted with a *.  You can use these links at no cost whatsoever to yourself. 
I only work with products I love and my opinions are my own.


Tuesday, 16 November 2021

Whimsy Stamps - DoveArt Watercoloured Tags

 Hello everyone,

Today I have a project to show you that I have been wanting to do for aaaages!

I have wanted to watercolour some of Jennifer Dove's beautiful Whimsy Stamps DoveArt images 

I finally got around to it last week after being inspired by some of Sandy Allnock's fabulous Christmas tags.
I am not a great watercolorist but this was something I really wanted to do and I had a lovely peaceful time painting these tags.

The thing with Jenn's images is that she shows you where the light and shade are in the design which makes them a pleasure to colour.

I also stamped and heat embossed the designs in black as the embossed outlines help contain the watercolour paint making it much easier to work with!

Enormous thanks to Sandy Allnock for always being so kind and inspirational!
Ingredients from Whimsy Stamps*

Thank you for popping by!
Have fun crafting!
from Sue...xxx

Sleigh Ride Rubber Cling Stamp - Whimsy Stamps Winter Lake Rubber Cling Stamp - Whimsy Stamps Snow Road Rubber Cling Stamp - Whimsy Stamps
Wintry Cabin Rubber Cling Stamp - Whimsy Stamps Winter Pines Rubber Cling Stamp - Whimsy Stamps Cardinal Birdhouse Rubber Cling Stamp - Whimsy Stamps
Chickadee and Berries Rubber Cling Stamp - Whimsy Stamps **NEW Stained Glass Window Die Set

Confession time! - quite by accident I used a retired stamp to create the santa tag - I'm so sorry but to be honest you could make a set of these tags using only one image and they would still be lovely!

Other Ingredients
WOW Embossing Pad Slow Drying
WOW Black Embossing Powder
Grey Pearlescent Card
Purple Ribbon


Please note that in order to assist with the running of this blog I do use affiliate links from time to time and there may be some in this post, denoted with a *.  I only work with products I love and my opinions are my own.
Please see my About Me page for more information.


Wednesday, 10 November 2021

Whimsy Stamps - Fadoodles Holly

Wednesday greetings friends!

I hope you are having a good week!

Today we have a fabulous Festive new release at wonderful

I have been playing with a beautiful stamp set 
I love these fabulously doodled images and decided to make some wrapping paper.

I cut a sheet of brown paper large enough for my gift (;  and stamped the holly images all over it in black ink.

Then I coloured the holly berries with red pencil and added some white dots to the design with a gel pen.

I added some gift tags which I die cut from Kraft card with the 

I stamped a sentiment and a small sprig of holly from the 
set onto the tags which I attached to the gift with baker's twine.
Ingredients from Whimsy Stamps*

Thank you for popping by today!
happy creating...
from Sue...xxx

**NEW FaDoodle Holly Clear Stamps Bookmark and Tags Die Set - Whimsy Stamps


Ingredients from Dies To Die For

Other Ingredients
Red Pencil
White Gel Pen
Baker's Twine
Gemini Jnr Die Cutting Machine


Please note that in order to assist with the running of this blog I do use affiliate links from time to time and there may be some in this post, denoted with a *.  I only work with products I love and my opinions are my own.
Please see my About Me page for more information.


Saturday, 3 July 2021

Animal Tiles and A2 Envelope Builder - Whimsy Stamps

 Happy Saturday friends,

I hope you are all well and have a good weekend planned!

I'm whizzing past today to show you two fabulous new 
products...
Animal Tiles Clear Stamps by Barbara Sproatmeyer
Ingredients from Whimsy Stamps

Thank you for popping by!
I hope you are all keeping well, have a lovely weekend and...
happy crafting!
from Sue...xxx

**NEW Animal Tiles - At the Pond Clear Stamps - Whimsy Stamps **NEW A2 Envelope Builder Die Set - Whimsy Stamps Simple Sentiment Strips Clear Stamps - Whimsy Stamps
**NEW Slimline Paper Pack - Enchanted Forest - Whimsy Stamps **NEW Slimline Paper Pack - Glorious Sky - Whimsy Stamps
DecoArt® Glamour Dust - Whimsy Stamps

Ingredients From Dies To Die For

Other Ingredients
Neenah Desert Storm Cardstock
Archival Ink Pad - Potting Soil
Gemini Jnr Die Cutting Machine
Quickie Glue Pen
Collall All Purpose Glue

Sending Smiles Across The Miles - E44, E84, BG96, YG97, YG95, YG17, YG25, YG23, W3, W00, Wink of Stella Clear Pen
Especially For You - RV11, RV00, R00, E50, BV31, B0000 


Please note that in order to assist with the running of this blog I do use affiliate links from time to time and there may be some in this post, denoted with a *.  You can use these links at no cost whatsoever to yourself. 
I only work with products I love and my opinions are my own.

Tuesday, 4 May 2021

Whimsy Stamps - Mermaid Dreams - Tuesday Tutorial

  Hello everyone,

Oh my word - these Tuesdays come round quickly don't they! - I swear time is speeding up! 

Today I'm sharing a sweet, (VERY sweet)! (; tutorial!
I'm going to keep you guessing today so if you don't read ahead you'll have a nice surprise - unless you can guess what I've made! 

If like me you adore Mer-May then Whimsy Stamps has got you covered!!
I decided to try something a little different with two of the fabulous Whimsy Stamps mermaid stamp sets.
and the 
Ingredients from Whimsy Stamps

Other Ingredients
Cling Wrap
Watercolour Card
To create the inky background for my project I used (Watercolour) Sparkle Pens but you could use any sort of watercolour pens or watercolour medium for this technique. 
Black Stazon Ink
Mini Mister or Spray Bottle
Precision Scissors
Cocktail Sticks
Glue (I used a cold glue gun) 
First I placed a piece of cling wrap on my glass mat and scribbled and dotted some inks in blue, turquoise and pink onto it.
I then sprayed water onto a piece of A4 watercolour card.
I then placed the inky cling wrap onto the card, pressed it down and scrunched it up slightly.
I took the cling wrap away and this was the effect...
I repeated this with a different selection of mermaid type colours!
I ended up with two inky deliciously inky backgrounds.
Then I randomly cut the card up into about odd shaped pieces - don't overthink this, just dive in with the scissors, random is best!  I cut the card into about eight pieces in total.
I then stamped the mermaid tail from the Mermaid Dreams  stamp set onto the inky card.
I use Stazon Ink for this as it works best on top of watercolours.  It doesn't bleed and it leaves a crisp outline.
I stamped six tails in total and the gorgeous mermaid from the Lets Be Mermaids stamp set.  (You can see I also stamped the seashells but I decided not to use them this time)
I then fussy cut the mermaid tails (not my favourite part but I'm getting better at it - (I'm a bit of a muppet because I have a Scan n Cut - I'm just too lazy to get it out and set it up)!
Make sure you keep all the off cuts - you will need them later!
I coloured the mermaid with Copic Markers
Hair - E47, E39, YR27, YR24, YR21
Skin - R20, E04, E11, E00, E000
Tail - B39, BG07, BG15, BG01, BG11, YG00, White Gel Pen
I then fussy cut her...
Here's where you need the offcuts I said to save earlier! - I used the smallest and second smallest dies from the Wavy Nested Frames Die Set to cut shapes from the tail offcuts.
I then stamped a selection of sentiments from the Mermaid Dreams and Lets Be Mermaids stamp sets onto them (again with Stazon Ink)
Here is my lovely selection of tails, sentiments and a mermaid!
I used a glue gun to fix a cocktail stick to the back of each shape.  (You could use PVA but I'm impatient and I used the glue gun because it dries so quickly)!
...so, if you have n't already read ahead, can you guess what these are for! (;  ...

...well I did say it was a sweet tutorial! (:

I had a bit of a time deciding which stamp set to use for the cupcakes!  I uuuummed and aaaaaahed over using...  
Unicorn Wishes Clear Stamps - Whimsy Stamps 
or
Over the Moon Clear Stamps - Whimsy Stamps

...and I already have a few more ideas up my sleeve for halloween! (;

Thank you so much for popping by today!  I hope you've enjoyed my tutorial, it would be great to see your projects so remember to share them with us!

look after yourselves and those you love!

Happy creating from Sue...xxx

Mermaid Dreams Clear Stamps - Whimsy Stamps Let's Be Mermaids Clear Stamps - Whimsy Stamps Wavy Nested Frames Die Set - Whimsy Stamps


Please note that in order to assist with the running of this blog I do use affiliate links from time to time and there may be some in this post, denoted with a *.  You can use these links at no cost whatsoever to yourself. 
I only work with products I love and my opinions are my own.