Showing posts with label Amped2Stamp. Show all posts

Monday, 5 July 2021

Magical Wonderland (Slimline Connected Rectangles - Whimsy Stamps)

 Happy Monday friends!
(There is such a thing - honest)! (:

Today I am showing you a card I made with a gorgeous new 
slimline die

This die is soooo elegant and I decided to use it to make a Christmas card to contribute to my own personal 'two Christmas cards a month' challenge!
I created the inky piece of card by blending Distress Oxides in Seedless Preserves, Spun Sugar and Tattered Rose over a piece of Strathmore Bristol Vellum Card.

Then splattered the card with water and Mica Powder.  When everything was dry I splattered white paint over it.  

I then die cut a piece of white hammered card with the 
and trimmed the inky card so it fitted just inside it.

Then again using white hammered card I die cut the gorgeous 
and trimmed and played the trees and deer behind the rectangles.  Once I was happy I glued everything down.

I stamped the Magical Wonderland sentiment from the
onto a piece of hammered card and die cut it with a 

Finally I added some Glamour Dust to make the whole scene twinkle!
Ingredients from Whimsy Stamps

Thank you for visiting me today, I hope you are all keeping safe and well.
Happy creating!
from Sue...xxx 

**NEW Slimline Connected Rectangles Die - Whimsy Stamps Forest Majesty Die Set - Whimsy Stamps
 Magical Winter Clear Stamps - Whimsy Stamps Quick Strips Die Set - Whimsy Stamps
DecoArt® Glamour Dust - Whimsy Stamps


Other Ingredients
Strathmore Bristol Smooth Vellum Card
*Distress Oxide Ink Pads - Seedless PreservesSpun Sugar and Tattered Rose
Mica Powder (Perfect Pearls)
300gsm White Card
Copic Opaque White
Gemini Jnr Die Cutting Machine
Quickie Glue Pen

Please note that in order to assist with the running of this blog I do use affiliate links from time to time and there may be some in this post, denoted with a *.  I only work with products I love and my opinions are my own.
Please see my About Me page for more information.


Wednesday, 10 March 2021

Magnolia Die - Whimsy Stamps

 Hello everyone...

We have a gorgeous Mini Release today at

I have used a beautiful new die
by Denise Lynn and Deb Davis (Amped2Stamp)
It is not the sort of product I would usually play with but I have to say I LOVE it!
I made three cards straight out of the box and really enjoyed myself!

I used a selection of inky backgrounds (the ones I hoard)! (: and tried a few different die cut designs.

To be honest, I did n't need to stop at three - I could have made dozens!
I think this slimline card is my own favourite!

Ingredients from Whimsy Stamps

**NEW Magnolia A2 Die - Whimsy Stamps Slimline Marquee Die - Whimsy Stamps Happy Headlines Clear Stamps - Whimsy Stamps Sparkletz - Coral Coast - Whimsy Stamps

I love the colours on this one!


**NEW Fantabulous Clear Stamps - Whimsy Stamps Friend Word and Shadow Die Set - Whimsy Stamps
I like the CAS style of this one with the single purple flower.

Bookmark and Tags Die Set - Whimsy Stamps Simple Sentiment Strips Clear Stamps - Whimsy Stamps

Thank you for popping by!
Look after yourselves and Happy Creating!
love from
Sue...xxx


Other Ingredients


Please note that in order to assist with the running of this blog I do use affiliate links from time to time and there may be some in this post, denoted with a *.  I only work with products I love and my opinions are my own.
Please see my About Me page for more information.


Wednesday, 3 March 2021

Glorious Easter - Savior Sentments Whimsy Stamps

 Hello everyone,

I hope this week is being kind to you.

I had a lovely morning's crafting last week making some quick Easter cards with two beautiful new products from Whimsy Stamps
I may have said before that I am a total hoarder and I never throw away bits of inky card - well this is the reason why!

I sorted through my scrap card box (yep I have a box!) /-: - and found a few pieces of card that I thought would look great with the Savior Sentiments.

I then die cut the inky pieces with a selection of shaped dies - I also got to use some of the smaller dies in these sets which does nt happen very often!

I stamped sentiments from the Savior set on to the inky card and fixed them to a piece of white watercolour card.

I added other sentiments in grey ink around the edges of the designs and then added some sequins.  If you wanted something similar you could use 
or

Finally I layered the design onto a second slightly larger piece of white card.
I added a die cut from the 
to create the card above.
Ingredients from Whimsy Stamps
Thank you for popping by...
Happy creating
love from
Sue...xxx

**NEW Savior Clear Stamps - Whimsy Stamps **NEW Savior Die Set - Whimsy Stamps
Pierced and Stitched Circles Die Set - Whimsy Stamps Wonky Stitched Rectangles Die Set - Whimsy Stamps Rounded Rectangles Die Set - Whimsy Stamps
Sparkletz - Salt Water - Whimsy StampsSparkletz - Snow Crystals - Whimsy Stamps


Other Ingredients


Please note that in order to assist with the running of this blog I do use affiliate links from time to time and there may be some in this post, denoted with a *.  I only work with products I love and my opinions are my own.
Please see my About Me page for more information.


Monday, 1 June 2020

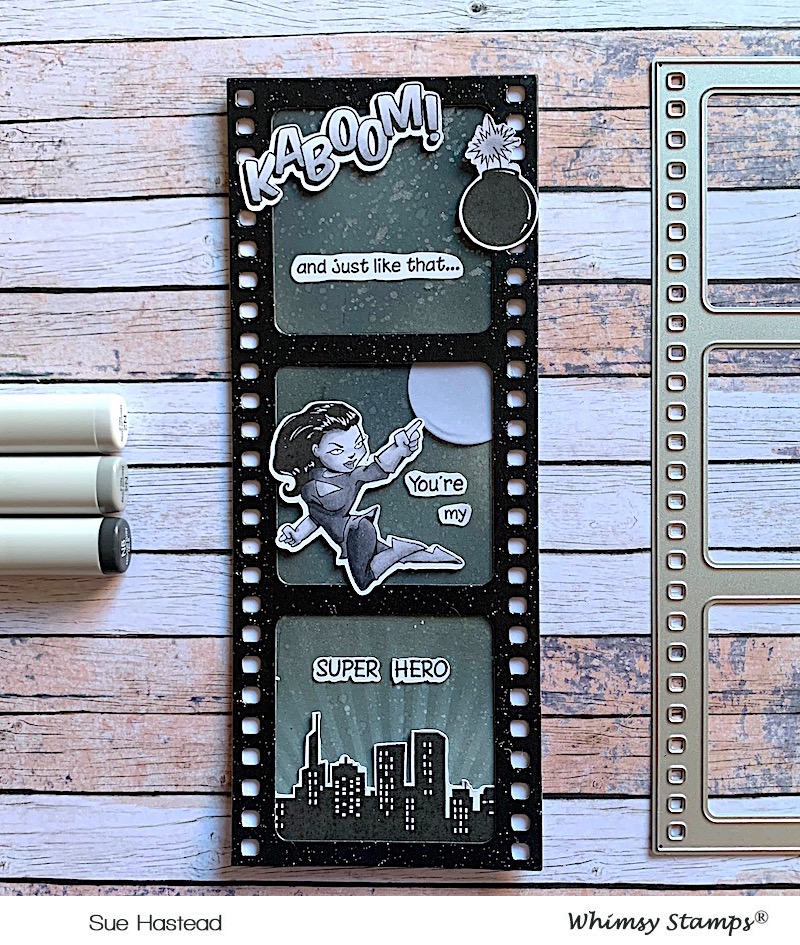
BAM! KABOOM! - Whimsy Stamps New Release

Happy Monday everyone,

I hope things are well with you all!

I'm here to day to show you some SUPER new goodies from
This was such a fun card to make, I wanted to go for a black and white movie vibe!

Ingredients from Whimsy Stamps

First I coloured the images from the 
with
N8, N6, N4, N2, N0

I cut them out and set them aside.

Then I blended some Distress Oxides in Weathered Wood and Black Soot over some smooth card and splattered it with water and Perfect Pearls.

I die cut ice of sparkly black card with the fab-u-lous

I trimmed the inky card into squares the right size to sit behind the apertures in the film strip die.

On one of the squares I used the 
with some white pigment ink to create the strobe effect in the sky background.

I assembled the card as shown, adding a selection of the fab sentiments that come with the 

Thank you for popping by today!

I hope you are all managing to stay safe and healthy in these unsettling times!

Happy Crafting
love from Sue...xxx
*NEW BAM! You're Old Clear Stamps - Whimsy Stamps *NEW Slimline Film Strip Die - Whimsy Stamps
Sun Rays Stencil - Whimsy Stamps

Other Ingredients
Distress Oxides in Black Soot* and Weathered Wood*
Perfect Pearls
ColorBox Frost White Pigment Ink
Charcoal Sparkle Print Card from Paper Mill Direct
Stix2 1mm Foam Tape


In order to assist with the running of this blog I do use affiliate links from time to time and there may be some in this post, denoted with a *.  
I only work with products I love and my opinions are all my own.
Please see my About Me page for more information.

Sunday, 24 May 2020

Wrinkles can be gorgeous!... (Whimsy Stamps)

Hello everyone,

I hope that despite these odd times you are managing to have a nice Bank Holiday Weekend!

I'm here today with a card that is similar to one already made recently but I like the layout - so - what can I say???
The eagle eyed amongst you will notice the similarity to my Cattitudes card but I thought the design would work equally well for these cute pugs so I had another play!

Ingredients from Whimsy Stamps 
Wrinkles Clear Stamps by Deb Davis Amped2Stamp*
Pierced and Stitched Circles Die Set*
Quick Strips Die Set*
Crafty Foam Tape
Other Ingredients
Make It Colour Blending Card by Elaine Hughes Marker Geek
Inkon3 Blackout Detail Hybrid Ink
Copic Markers - Puppy Pugs - T9, T7, T5, T3, E30 
Distress Oxide Ink Pads in Worn Lipstick, Salty Ocean, Mowed Lawn
Taylored Expressions Blender Brushes
Perfect Pearls

Thank you for popping by today!

I hope you are all managing to stay safe and healthy in these unsettling times!

Happy Crafting
From Sue…xxx

*NEW Wrinkles Clear Stamps - Whimsy Stamps Pierced and Stitched Circles Die Set - Whimsy Stamps Quick Strips Die Set - Whimsy Stamps
Crafty Foam Tape White - Whimsy Stamps

Friday, 22 May 2020

Happy Skies - Whimsy Stamps - Fresh Friday...

It's my favourite day of the week...

It's Fresh Friday!

This is where we mix up some older and newer stash from wonderful

This week I am playing with
Happy Sky Clear Stamps by Deb Davis - Amped2Stamp
The rainbow has become such a special theme these last few months that I decided to choose that as my main design for this card.

First I die cut a piece of smooth white card with the largest

Then I created a mask with a rectangle aperture and place that over the card.  I then blended blue ink over the aperture to create a blue rectangle on my card design. I flicked a tiny bit of water over the ink to give it some texture.

I stamped the sentiment from the 
Happy Sky Stamp Set
underneath the inky rectangle as shown.

I stamped the rainbow and clouds from the 
Happy Sky Stamp Set
and coloured them with Copic Markers
Clouds - BV31, BG0000, 
Rainbow - R39, R32, YR09, Y17, Y13, YG17, YG13, BG15, B19, V09, BV04, RV19, RV17

Then I cut them out and added some sparkle to the rainbow using Mod Podge and 

I fixed the rainbow and clouds to the card design with

Finally I die cut some white card with the 
and fixed it to the top of the card design as shown.
Ingredients from Whimsy Stamps
Happy Sky Clear Stamps by Deb Davis - Amped2Stamp

Thank you for popping by today!

I hope you are all managing to stay safe and healthy in these unsettling times!

Happy Crafting
From Sue…xxx

 Smile Large Word Die - Whimsy Stamps Wonky Stitched Rectangles Die Set - Whimsy Stamps
Crafty Foam Tape White - Whimsy Stamps 
DecoArt® Glamour Dust - Whimsy Stamps


Other Ingredients Used 
Make It Colour Blending Card by Elaine Hughes - Marker Geek
Inkon3 Blackout Hybrid Detail Ink from Dies To Die For
Distress Oxide In Salty Ocean
Blender Brushes from Dies To Die For
Matt Mod Podge
Crystal Glamour Dust

Please note that in order to assist with the running of this blog I do use affiliate links from time to time and there may be some in this post, denoted with a *.  I only work with products I love and my opinions are my own.
Please see my About Me page for more information.