Saturday, 21 March 2020

Whimsy Stamps - Syeda - Fresh Friday Part 2!...

Well Hello Saturday!

How things have changed in the space of one week!


I am wishing you and your's well today, I can hardly believe what is happening in the world at the moment, it is truly shocking and more than a little scary!

It almost feels trivial to be sat here creating and sharing my creations at such a time of stress for so many.  

I only hope that the colourful world we create is a break from the madness and gives some solace!

Stay safe and well friends!

I am back today with another card I made for our 
Whimsy Stamps 
Fresh Friday Feature!

If you follow the link 
HERE
you can see all of this week's
Fresh Friday Products

Every week, we'll be mixing up new goodies with a few oldies from the stash. 

This week, I'm playing with
Polka Dot Pals Syeda
&
Up In The Clouds Die Set
Gorgeous Syeda is coloured with Copics and fussy cut.
Skin - E71, E21, E00, E50
Hair - E44, E37, E49
Clothes - B60, B63, B66, B37, B05, B02
Piggie - BV31, YR02, R12, YR01, YR000

I created the background using the 
Notched Squares Die

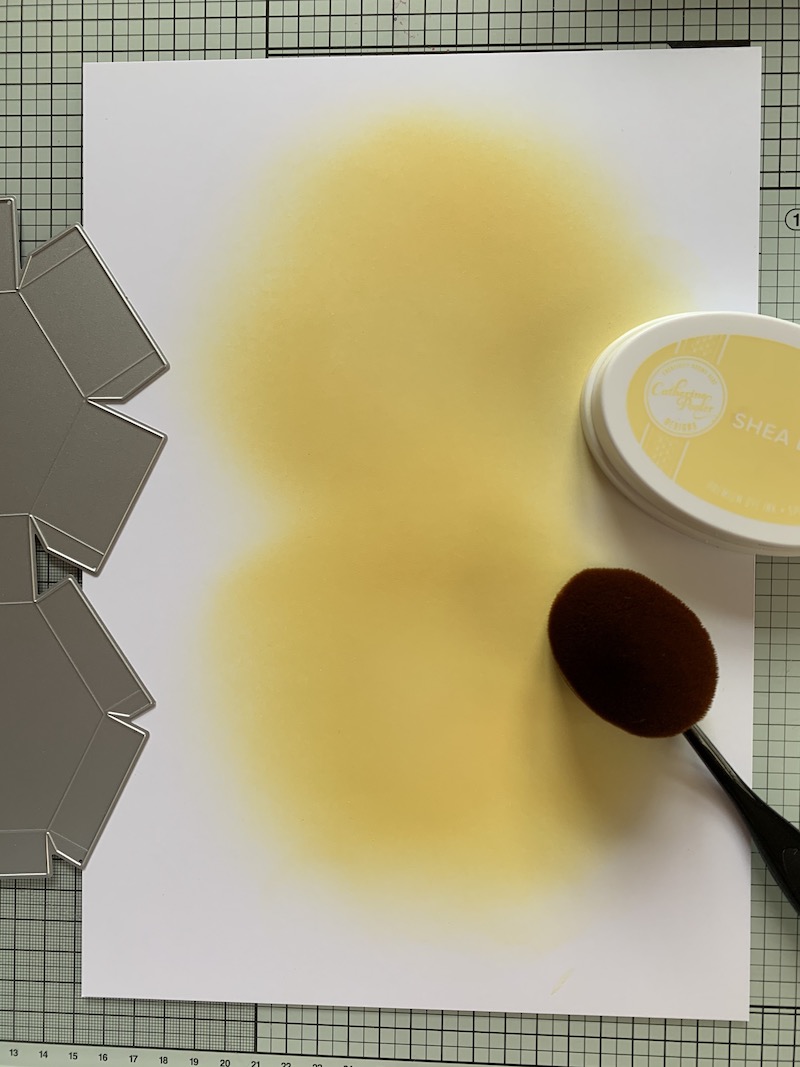
I left the card in the die and blended Distress Oxides around the edge.
The colour is a happy accident when I used a blending brush with Scattered Straw on it and added some Tumbled Glass!  I was pleasantly surprised with how the colour came out! 

I made the clouds by cutting a cloud template with the largest cloud die from the 
Up In The Clouds Die Set
and using it as a stencil to create clouds on a piece of card.

Then I die cut some cloud shapes from it.

I fixed Syeda and the clouds to the background as shown with 
Crafty Foam Tape
and finally added a sentiment 
from 
Beaucoup Bouquet Sentiments
If you have nt already joined, it's a great time to become a member of the 
Whimsy Stamps

..and there's more! ... if you join up following this link
you will get a $5 off reward discount!

Please have a good look around the 


at the gorgeous cards by the rest of the Whimsy Stamps Creative Team – and then follow that with a trip to 
store for some essential retail therapy!

Thank you for popping by today!

I hope you are all managing to stay safe and healthy in these uncertain and worrying times!

Happy Crafting

From Sue…xxx
Polka Dot Pals Syeda Clear Stamps Up in the Clouds Die Set
Notched Squares Die Set  Beaucoup Bouquet Sentiments Clear Stamps
Crafty Foam Tape White

Friday, 20 March 2020

Whimsy Stamps Fresh Friday - Up In The Clouds

Hello everyone.

Wishing you all well today, I can hardly believe what is happening in the world at the moment, it is truly shocking and more than a little scary!

It almost feels trivial to be sat here creating and sharing at such a time of stress for so many.  

I only hope that the colourful world we create is a break from the madness and gives some solace!

Stay safe and well friends!

I'm back today to show you a card I made for our 
Whimsy Stamps 
Fresh Friday Feature!

If you follow the link 
HERE
you can see all of this week's
Fresh Friday Products

Every week, we'll be mixing up new goodies with a few oldies from the stash. 

This week, I'm playing with
Up In The Clouds Die Set
This card is something a little different for me but I really enjoyed making it!  It's really amazing how looking through older stash with fresh eyes can give you new ideas!

I created an aperture mask of a square and fixed it to a piece of watercolour card.

I blended from the top down, Distress Oxides in
Chipped Sapphire, Tumbled Glass, Scattered Straw, Wild Honey, Spiced Marmalade and Abandoned Coral, then I flicked a little bit of water over it and let it dry naturally.

I die cut the sun from a piece of card I had already swooshed some Arteza Brush pens on for another project!  I always keep bits of inky card because you never know when they will come in useful! (;

I die cut the clouds from watercolour card and vellum and fixed the sun and the clouds to the card as shown with 

Finally I stamped the sentiment from the 
onto watercolour card and
and die cut it with a die from the 


If you have nt already joined, it's a great time to become a member of the 
Whimsy Stamps

..and there's more! ... if you join up following this link
you will get a $5 off reward discount!

Please have a good look around the 

at the gorgeous cards by the rest of the Whimsy Stamps Creative Team – and then follow that with a trip to 
store for some essential retail therapy!

Thank you for popping by today!

I hope you are all managing to stay safe and healthy in these uncertain and worrying times!

Happy Crafting

From Sue…xxx
Up in the Clouds Die Set Bunny Buddies Clear Stamps Quick Strips Die Set
Crafty Foam Tape White

Life Goes On - Whimsy Stamps Special Release...

Hello everyone,

I hope you are all well and managing to stay safe and healthy!

Today sees a very special release of the most beautiful products from
Whimsy Stamps
The Whimsy Team have had such a lovely time creating these samples, they are so special to us as the goodies were designed by our lovely Deb Davis - Amped2Stamp!

I could have made dozens of cards - I limited myself to four in the end which i will share with you over the coming days!

I'm kicking things off with these beauties...
Ingredients from Whimsy Stamps 

Other Ingredients
Watercolour Card
Arteza Brush Pens - however, the
stocked at Whimsy Stamps would be perfect as well!
Vellum 
Black Stazon Ink
Glue
Clear Chunky Glitter
 

I used a really easy technique to create the sunflower background.

I chose the colours I wanted for my sunflower and painted the stamp with brush markers roughly where I wanted each colour to be.  Then I sprayed the stamp lightly with water and quickly stamped the image onto watercolour card.

I have to say I was really happy with the effect!

I used the goodies as shown to make my cards.

If you have nt already joined, it's a great time to become a member of the 
Whimsy Stamps

..and there's more! ... if you join up following this link
you will get a $5 off reward discount!

Please have a good look around the 

at the gorgeous cards by the rest of the Whimsy Stamps Creative Team – and then follow that with a trip to 
store for some essential retail therapy!

Thank you for popping by today!

I hope you are all managing to stay safe and healthy in these uncertain and worrying times!

Happy Crafting

From Sue…xxx
*NEW Sunflower Background Rubber Cling Stamp*NEW Lattice A2 Die Shaker Maker Rectangle Die Set

*NEW Sympathy Life Goes On Clear Stamps Notched Squares Die Set

Thursday, 19 March 2020

Sending Big Hugs - Bonnie Loves Bows...

Hello friends.

Wishing you all well today, I can hardly believe what is happening in the world at the moment, it is truly shocking and more than a little scary!

It almost feels trivial to be sat here creating and sharing at such a time of stress for so many.  

I only hope that the colourful world we create is a break from the madness and gives some solace!

Stay safe and well friends!

I am sharing a card today created with a beautiful stamp from
I purposefully chose a deeper colour palette to challenge myself with the reds and the skirt folds!

Copic Colours Used
Hair - E47, E44, E43, 
Skin - V12, E93, E00
Reds - R59, R46, R27, R14, R14, R000, R00
Browns - E18, E19, E15

I added some Wink of Stella to her fluffy underskirt!

Although it can be a bit of a b**gg*r I do really enjoy colouring in red!
Ingredients from
Be sure to have a look around our
to see the gorgeous DT creations there and then to 
to engage in some essential retail therapy!

Thank you for popping by!
Happy crafting - look after yourselves and each other!
from Sue...xxx

Tuesday, 17 March 2020

Be lucky...

Hello everyone and a very happy St Patrick's Day!

Lovely Deb Davis at 
has designed a brilliant stamp set to celebrate today!

I really enjoyed making this card!  I challenged myself to think outside the box with it!

First I created a slimline card blank slightly larger than the 
and I used that die to cut a piece of black card. 

Next I splattered green and black Sparkle Pens onto a piece of watercolour card which I then trimmed to sit just inside the slimline die.

I layered the card blank, the black card and the inky card together as shown.

I then blended Distress Oxides Inks in Cracked Pistachio, Peacock Feathers and Twisted Citron over a piece of  smooth card.

I stamped the hat from the 
stamp set several times onto the blended ink and using the 
I cut out the words Be Lucky

I then fixed the letters to a piece of black card with
which I then fixed to the card design as shown, (again with foam tape)

Ingredients from Whimsy Stamps

Thank you for popping by today!

I hope you are all managing to stay safe and healthy in these uncertain and worrying times!

Happy Crafting

From Sue…xxx

*NEW Shamrock Top Hat Clear Stamps Slimline Postage Die Bold ABC Die Set
Crafty Foam Tape White


Please note that in order to assist with the running of this blog I do use affiliate links from time to time and there may be some in this post, denoted with a *.  I only work with products I love and my opinions are my own.
Please see my About Me page for more information.

Tuesday, 10 March 2020

Chicks and Chocolates!...

Happy Tuesday everyone!

Today I have something to show you that combines two of my favourite things...
colouring and chocolate! 

I have used a great new release item from 
Whimsy Stamps
which I am certainly going to be using a lot!

Hexagon Treat Box Die
I have written a quick tutorial for you so you can see how I put this lovely box together!
The first thing I did was stamp and colour one of the the cute chicks from the 
Early Birds Clear Stamp Set by Dustin Pike
Then I inked up a piece of card with blue ink and stencilled darker blue dots over the top.  I die cut a hexagon from the inky card with the 
Nested Hexagon Die Set
 
I inked up a second piece of card so that the inky patch was about the same size as the 
Hexagon Treat Box Die
Then using the 
Farmhouse Basket Stencil I inked the card again.
I die cut the inky card with the 
Hexagon Treat Box Die

I then used the 
Nested Hexagon Die Set
  to cut an aperture in the box lid, the blue dotty hexagon created earlier and a piece of acetate.
I layered the die cut acetate and the dotty hexagon and fixed the to the box lid.  This creates a box lid you can see through.
Using a bone folder I made all the creases in the die cut box.  (You'll thank me for the tip of using a bone folder, it makes the creases really sharp which in turn makes sticking the box together really straightforward)!  I fixed the box together with 
Nuvo Deluxe Adhesive

Finally I fixed the chick to the top of the box with a 
Mini Action Wobble Spring
This was such fun to make and is a really cute gift!  Who can resist that wobbly chick - not to mention the chocolates! 

If you have nt already joined, it's a great time to become a member of the 
Whimsy Stamps

..and there's more! ... if you join up following this link
you will get a $5 off reward discount!

Please have a good look around the 
at the gorgeous cards by the rest of the Whimsy Stamps Creative Team – and then follow that with a trip to 
store for some essential retail therapy!

Happy Crafting

From Sue…xxx


*NEW Hexagon Treat Box Die Early Birds Clear Stamps *NEW Nested Hexagon Die Set
Farmhouse Basket Stencil  Nuvo - Deluxe Adhesive

Mini Action Wobbles Springs - 12 pack