Thursday, 29 April 2021

Curvy Girl With A Diamond - Stamping Bella

 Hello everyone,

I hope this week is being kind to you!

Today I have a card to show you that I made a while ago, I had a complete lack of confidence about showing it to you because it was the first card I made after I broke my leg last year!
It took me ages to colour and I felt a bit out of sorts at the time!

However, I really want to share it because it is coloured with pencils - which I love doing, and was a birthday card for my son's gorgeous girlfriend Emily - and she adored it!

Ingredients from Dies To Die For
Thank you for popping by today!

Look after yourselves and happy creating!
from Sue...xxx
Other Ingredients
Bazzill Basics Kraft Card
Archival Ink - Potting Shed
Distress Oxide in Tumbled Glass
Pink Organza Ribbon
Starry Skies Sparkletz (Whimsy Stamps)
Wink of Stella Clear Pen

Skin - Aubergine, Salmon Pink, Granite Rose 
Hair - Umber, Chestnut, Cinnamon, Golden OchreLeaves - Emerald Green  
Diamond - Steel Gray, Bluish Pale, White
Dress - Olive Grey, Purple Violet, Purple, Light Purple, White
White Details - Brownish Beige, Light Beige, White 
Ground - Sepia, 


Tuesday, 27 April 2021

Whimsy Stamps and Scrapbook Adhesives Instagram Hop...

 Hello everyone!

Today I am joining in with a fab and fun instagram hop
with 
I have used some gorgeous products and I'll do a list for you later in this post!
I had such fun creating this underworld scene for this gorgeous mermaid!

I stamped the Sweet and Salty Clear Stamps mermaid in black ink onto a piece of card suitable for alcohol markers and  coloured her with Copic markers.  (I'll list the colours I used at the end of this post).  I then fussy cut her and set her aside.

I created the background by running a piece of white water colour card thorough the Slimline Embossing Folder - Wave Lengths   I then cut the card into a 8.25 x 21.5cm rectangle and swooshed some blue ink over it.  I'll post a link to an earlier tutorial for this technique at the end of this post.

Then I die cut a piece of white water colour card with the Slimline Waves Die...


...and fixed the frame to the background with Scrapbook Adhesives Dots.

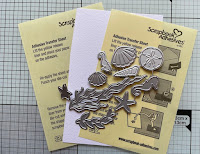
Next I created the elements for the undersea background with the Build an Ocean Die Set and Scrapbook Adhesives Transfer Sheet.
 

I fixed a piece of adhesive transfer sheet to both sides of a piece of watercolour card and die cut the build an ocean elements.
 
I then peeled the transfer sheet from the top side of the die cuts and sprinkled them with clear and blue glitter. 
 I used my finger to burnish the glitter slightly so it stuck well to the background.
I then peeled the transfer sheet from the back of the die cuts and fixed them to the card design.

I then used the Build an Ocean Die Set and the Scrapbook Adhesives 3D Foam Creative Embellishment Kit to make some extra shells for the undersea background.  
This was really easy to do and the final effect is FAB!
 
I die cut the shells with the foam sheet and then removed the top sheet and applied the foil...
I then gently rubbed the foil with my finger until it came away from the backing, I was left with a beautiful shiny silver shell.
I fixed all the elements to the card design and finally added the mermaid using the EZ Dots runner - brilliant!  The teeny tiny dots stuck to the fussy cut mermaid's intricate parts and made fixing her down so much tidier and easier!

I used the Wavy Nested Frames Die Set, a sentiment from the 
Sweet and Salty Clear Stamps set and Scrapbook Adhesives 3D Foam Dots to create the sentiment panel.
 
I stamped the sentiment onto the die cut and fixed it to the card design with Scrapbook Adhesives 3D Foam Dots.  

Finally I added some Starry Sky Spakletz.
Ingredients from Whimsy Stamps

Thank you for popping by today!
Hope you are all keeping well, look after yourselves and happy creating...
love from
Sue...xxx

Now here's the important info so you can join in with our instahop and try and win a gift voucher to treat yourself to some Whimsy Stamps and ScrapBook Adhesives by 3L goodies!

The best place to start is on my instagram feed which you can find by following this link
or by using your own instagram app and searching for me
@tanglemousecards

If you then look at my insta post featuring the insta hop banner and this card you will see all the hop instructions and be good to go! 

Happy hopping and good luck!

Sweet and Salty Clear Stamps - Whimsy Stamps **NEW Slimline Embossing Folder - Wave Lengths - Whimsy Stamps Slimline Waves Die - Whimsy Stamps
Build-an-Ocean Die Set - Whimsy Stamps Wavy Nested Frames Die Set - Whimsy Stamps
Sparkletz - Starry Sky - Whimsy Stamps


Other Ingredients
Crafter's Companion Sparkle Pens
Hobby Craft Glitter

Sea - BG000, BG41, BG52, BG45
Sand - E50, E40, E41, E43
Skin - E04, E11, E00, E000, R20, R00
Hair - BV02, BV13, BV04, BV17, BV29
Tail - BV02, BV13, BV04, BV17, BV29, BG11
Clam Bra - C3, C1, C0

Link to Swoosy Inky Background Tutorial can be found 


Please note that in order to assist with the running of this blog I do use affiliate links from time to time and there may be some in this post, denoted with a *.  You can use these links at no cost whatsoever to yourself. 
I only work with products I love and my opinions are my own.
Please see my About Me page for more information.

Thursday, 22 April 2021

Princess Dragon - Whimsy Stamps

 Hello everyone.

Well - it has been quite a week!  I have so enjoyed showing you the latest release of 
gorgeousness!
I hope you're enjoying the new releases.

I'm back today to show you a fabulous stamp set
and
a beautiful paper pack
This was such fun to colour - I tried as much as possible to match the tower colours to the slimline paper colours.  (I'll pop a list of the Copic colours I used at the end of this post for you).

This princess looks like she has been waiting too long for her prince! (: 
Ingredients from Whimsy Stamps

Thank you for popping by today, look after yourselves and those you love!
Happy Crafting
from Sue...xxx

**NEW Princess Dragons Clear Stamps - Whimsy Stamps  **NEW Slimline Paper Pack - Enchanted Kingdom - Whimsy Stamps

Slimline Scenic Countryside Die - Whimsy Stamps Up in the Clouds Die Set - Whimsy Stamps Wavy Nested Frames Die Set - Whimsy Stamps


Other Ingredients

Princess Dragon - BG75, BG72, BG23, BG11, BG10, C3, C1, C00
Hat - R37, R35, R05
Tower Roof - BG75, BG72, BG23, BG11, BG10
Tower - E47, E44, E43, E42, 
Grass - YG17, YG13, YG01


Please note that in order to assist with the running of this blog I do use affiliate links from time to time and there may be some in this post, denoted with a *.  You can use these links at no cost whatsoever to yourself. 
I only work with products I love and my opinions are my own.
Please see my About Me page for more information.




Wednesday, 21 April 2021

Whimsy Stamps Slimline Bone Die - fantabulous four legged furry friends!

Hello everyone,

Today I have a card to show you made with a really clever die, which for any doggy 'pawrent' will be a must!  

This clever die gave me the chance to use one of my favourite Whimsy Stamps die sets,

I have blended Distress Ink in Scattered Straw and Dried Marigold over one half of the die cut.

I coloured the Adopt Don't Shop furry gang in Copics and fussy cut them.

I blended Distress Ink in Ground Expresso around the edge of piece of design paper from the Black and White Dog Slimline Pack so that the paper matched my colour theme and layered the die cut dog bone onto it.

I stamped the sentiment from the 
Fantabulous Clear Stamps Set in brown ink on the right hand side of the die cut and fixed the fussy cut image to the left hand side as shown.

I added a sentiment from the Adopt Don't Shop Set which I stamped onto a die cut 

Finally I added some enamel dots and mounted the whole design onto a piece of dark brown card.
Ingredients from Whimsy Stamps

Thank you for popping by today!
Look after yourselves and Happy Crafting!

love from
Sue...xxx

**NEW Slimline Dog Bone Die Set - Whimsy Stamps

Adopt Don't Shop DOGS Clear Stamps - Whimsy Stamps **NEW Fantabulous Clear Stamps - Whimsy Stamps
Comic Speech Bubbles Die Set - Whimsy Stamps **NEW Slimline Paper Pack - Black and White Dog - Whimsy Stamps

Other Ingredients
Distress Inks* in Scattered Straw, Dried Marigold, Ground Expresso

Furry Gang Left to Right
E35, E34, E31, N6, N4, N3, C5, C3, C1, E47, E44, E43, E42, E09, E15, E11, E00
Cheeks R12


Please note that in order to assist with the running of this blog I do use affiliate links from time to time and there may be some in this post, denoted with a *.  You can use these links at no cost whatsoever to yourself. 
I only work with products I love and my opinions are my own.
Please see my About Me page for more information.


Tuesday, 20 April 2021

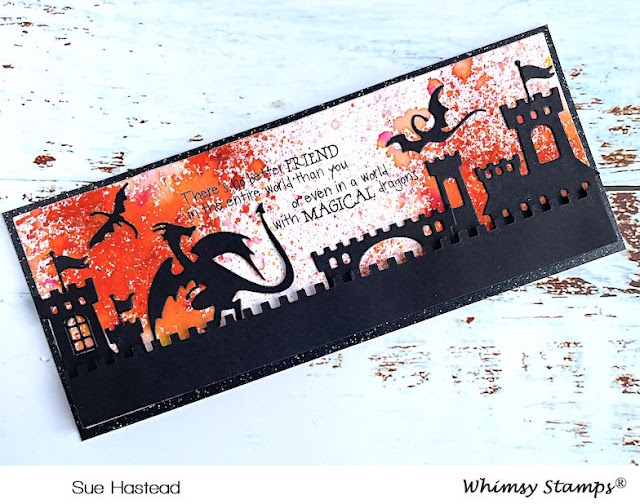
Whimsy Stamps Build A Castle Die Set - or - Mother Of Dragons!

 Hello friends and Happy Tuesday!

April is true to form and like every other month recently is rushing away - or perhaps I'm just old and time is speeding up...  o-:

Today with have a super new release of wonderful
Whimsy Stamps Goodies!
I could hardly stop myself crafting with them and over the next few days have three cards to show you!

The first, made with the 
is my own favourite...
(I was thinking Game of Thrones thoughts when I made this one! (:
This was great fun to make and very straightforward.

I used some fabulous Lindy's Stamp Gang Magic Powders to create the background and die cut the inky card with the Slimline Card Builder Die.

I then die cut the Build A Castle Die in black card and created the silhouette as shown by trimming the pieces down to fit along the bottom of the card.  I love this die - I mean who could resist the windows and teeny tiny flags - not to mention those a-ma-zing dragons!

Once I had lined up the design I fixed it in place and stamped that perfect sentiment from the 

Finally I layered the design onto a piece of black sparkle card.

Mother.Of.Dragons!

Thank you for popping by today - stay tuned this week for some more Whimsy Stamps gorgeousness!

...take care of yourselves and happy creating
from Sue...xxx

**NEW Build-a-Castle Die Set - Whimsy Stamps

Slimline Card Builder Die - Whimsy Stamps Magical Birthday Wishes Clear Stamps - Whimsy Stamps


Other Ingredients
Black Card and Charcoal Black Pure Pearl Sparkle Card from Papermill Direct


Please note that in order to assist with the running of this blog I do use affiliate links from time to time and there may be some in this post, denoted with a *.  You can use these links at no cost whatsoever to yourself. 
I only work with products I love and my opinions are my own.
Please see my About Me page for more information.


Sunday, 18 April 2021

Whimsy Stamps - Gnome Think Spring!

 Happy Sunday Friends...

I have been enabling my Gnome crush!

I absolutely can not resist Crissy Armstrong's beautiful Gnome images for

I have been playing with 
I used this gorgeous stamp set to make a card and a matching envelope!

The gnomes are coloured with Prismacolor pencils, I'll pop a list of the colours I used at the end of this post for you.

Is it wrong to want to post this to myself /-:
Ingredients from Whimsy Stamps

Thank you for popping by today, I hope you have a super Sunday...
Happy creating
from Sue...xxx

**NEW Gnome Think Spring Clear Stamps - Whimsy Stamps **NEW Slimline Envelope Builder Die Set - Whimsy Stamps
                    **NEW Slimline Paper Pack - Enchanted Kingdom - Whimsy StampsDecoArt® Glamour Dust - Whimsy Stamps


Other Ingredients
Bazzill Basics Kraft Card
Catherine Pooler Ink Pad in Icing On The Cake
White Gelly Roll Gel Pen

Skin - Clay Rose, Nectar, Salmon Pink, Seashell Pink
Beard - Warm Grey, 50%, 30%, 20%, 10%, White
Hat - Card - Slate Grey, True Blue, Muted Turquoise
Envelope - Mulberry, Process Red, Hot Pink
Gown - Card - Mulberry, Process Red, Hot Pink
Envelope - Slate Grey, True Blue, Muted Turquoise
Shoes - Dark Umber, Light Umber, Ginger Root
Flowers - Bronze, Yellow Ochre, Canary Yellow, White
Butterflies - Bronze, Yellow Ochre, Canary Yellow. Mulberry, Process Red, Hot Pink
Ground - Indigo Blue, Slate Grey, White


Please note that in order to assist with the running of this blog I do use affiliate links from time to time and there may be some in this post, denoted with a *.  You can use these links at no cost whatsoever to yourself. 
I only work with products I love and my opinions are my own.
Please see my About Me page for more information.