Thursday, 2 July 2020

Bizzy Bees - Whimsy Stamps

Hello everyone

I'm back today to show you a card I made using some more 

First I stamped and coloured the cute bees with 
Copic Markers
YR18, YR16, YR04, Y17, Y15, Y13, N9, N7, N4, BG53, BG10, BG0000

Then I cut them out - but there are a matching set of dies you can use if you prefer...
Bizzy Bees Outline Die Set

Then I die cut a piece of watercolour card using the 
Slimline Card Builder
placing the circles dies as shown to create the apertures.

I die cut a second slimline piece of watercolour card with out any apertures and used the 
to create the background, blending Distress inks over it to create the honeycomb effect.  I then splattered water and Perfect Pearls over the inky background.

I fixed the card with the circular apertures over the inky card and fixed it down with 
Foam Tape

Then I die cut some white card with the 
Honeycomb Pattern Die 
and fixed it to the card design as shown.

I then fixed the cute 
Bizzy Bees
to the card design as shown.

Finally I stamped a sentiment from the 
Bizzy Bees Clear Stamps
onto white card and cut it out with a 
Quick Strips Die

I fixed the sentiment to the bottom of the card design as shown.
Ingredients from Whimsy Stamps
Please have a good look around the 
Whimsy Inspirations Blog 
at the gorgeous cards by the rest of the Whimsy Stamps Creative Team – and then follow that with a trip to 
Whimsy Stamps 
store for some essential retail therapy!

Thank you for popping by today!

I hope you are all managing to stay safe and healthy in these unsettling times!

Happy Crafting
From Sue…xxx
*NEW Bizzy Bees Clear Stamps - Whimsy Stamps *NEW Slimline Card Builder Die - Whimsy Stamps Bizzy Bees Outline Die Set - Limited Time ONLY - Whimsy Stamps

*NEW Honeycomb Drips Stencil - Whimsy Stamps

Honeycomb Pattern Die - Whimsy Stamps Quick Strips Die Set

Other Ingredients
Watercolour Card
Distress Oxide Ink Pads Squeezed Lemonade, Spicy Marmalade, Ripe Persimmon
Perfect Pearls
Make it Colour Blending Card by Elaine Hughes Marker Geek
Ink on 3 Blackout Detail Hybrid Ink Pad
Mod Podge
Crystal Glamour Dust
Catherine Pooler Ink Pad in Twilight

Please note that in order to assist with the running of this blog I do use affiliate links from time to time and there may be some in this post, denoted with a *.  I only work with products I love and my opinions are my own.
Please see my About Me page for more information.

Wednesday, 1 July 2020

Leland and Louisa - new release Polka Dot Pals from Whimsy Stamps...

Hello Wednesday and hello July!

We have a fabulous mini release today at 

I am showing you a card created with two beautiful stamp sets which can be used on their own or together!
by lovely Barbara Sproatmeyer
This was quite a colouring adventure for me but I'm glad I stuck with it!

I stamped and masked elements from both stamp sets by starting at the front and working backwards.

I coloured the whole scene with Copic markers using the markers to also draw in the background.

Copic Markers

Leland  
Hair - E49, E79, E77, E74
Skin - E27, E25, E23, 
Eyes - E35, E33, E31, T1, T3, T5
Clothes and Glasses - C9, C7, C5, W3, B97, B95, B91

Louisa
Hair - E47, E44, E43
Skin E04, E11, E00, E000
Eyes - E34, E33, E31
Clothes - YR18, YR16, YR04, YR15
C3, C1, C00

Background and Floor
C9, C7, C5, C3, C1, C0, C00
R39, R27, R35
BG49, BG45, BG11

I finished the card by layering it onto a piece of design paper from the 
Starring Hearts 6x6 Paper Pack
and adding the red and black sentiment die cut with the 
Sweet Word and Shadow Die Set
Ingredients from Whimsy Stamps
Starring Hearts 6x6 Paper Pack*
Sweet Word and Shadow Die Set*
Please have a good look around the 
Whimsy Inspirations Blog 
at the gorgeous cards by the rest of the Whimsy Stamps Creative Team – and then follow that with a trip to 
Whimsy Stamps 
store for some essential retail therapy!

Thank you for popping by today!

I hope you are all managing to stay safe and healthy in these unsettling times!

Happy Crafting
From Sue…xxx
*NEW Polka Dot Pals Leland Clear Stamps - Whimsy Stamps *NEW Polka Dot Pals Louisa Clear Stamps - Whimsy Stamps

6x6 Paper Pack - Starring Hearts - Whimsy Stamps

Sweet Word and Shadow Die Set - Whimsy Stamps

Other Ingredients
Make it Colour Blending Card by Elaine Hughes Marker Geek
Archival Ink Pad in Shadow Grey
White Gel Pen

Please note that in order to assist with the running of this blog I do use affiliate links from time to time and there may be some in this post, denoted with a *.  I only work with products I love and my opinions are my own.
Please see my About Me page for more information.

Tuesday, 30 June 2020

Sweet and Salty - Whimsy Stamps

Hello everyone!

I hope it's a happy Tuesday for you all!

I am flying by today with a card I have been wanting to make for aaaaages using the gorgeous 
I coloured this beautiful mermaid with Copic Markers
Skin E04, E11, E00, E000
Hair R30, RV42, R43, R39
Tail YR000, YR01, R12, R32, R35, R43, R56, E81, E84
Clam Shell Bra YR21, YR12, YR27, YR18

...and used white and red gel pens to add some sparkle to her tail.

I cut her out and layered her onto an inky background with an aperture made with a 
inside a rectangle die cut with a

I added a sentiment from the 
and finished the design with some 
Sweet and Salty Clear Stamps Set by Deb Davis Amped2Stamp*
Wavy Nested Frames Die*
Wonky Stitched Rectangles Die* 
Salt Water Sparkletz* 
Please have a good look around the 
Whimsy Inspirations Blog 
at the gorgeous cards by the rest of the Whimsy Stamps Creative Team – and then follow that with a trip to 
Whimsy Stamps 
store for some essential retail therapy!

Thank you for popping by today!

I hope you are all managing to stay safe and healthy in these unsettling times!

Happy Crafting
From Sue…xxx
Sweet and Salty Clear Stamps - Whimsy Stamps Wavy Nested Frames Die Set - Whimsy Stamps Wonky Stitched Rectangles Die Set - Whimsy Stamps
Sparkletz - Salt Water - Whimsy Stamps
Other Ingredients
Make it Colour Blending Card by Elaine Hughes Marker Geek
Ink on 3 Blackout Detail Hybrid Ink
Sakura Gelly Roll 0.8 White Gel Pen
Watercolour Card
Crafter's Companion Sparkle Pen in Deepest Ocean
Catherine Pooler Ink Pad in Twilight


Please note that in order to assist with the running of this blog I do use affiliate links from time to time and there may be some in this post, denoted with a *.  I only work with products I love and my opinions are my own.
Please see my About Me page for more information.

Monday, 29 June 2020

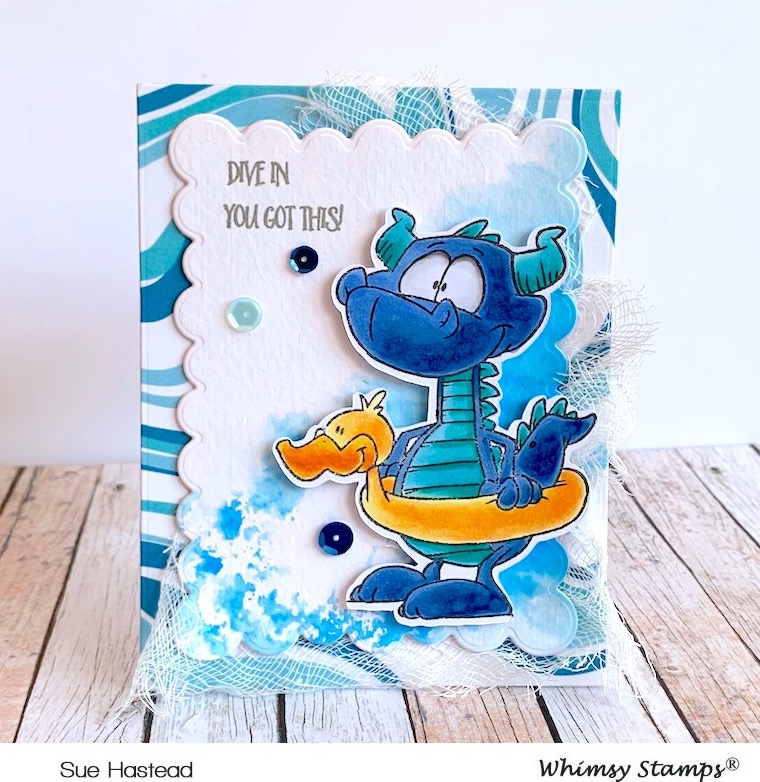
Dragon Water Fun - Whimsy Stamps

Hello everyone...

Today I have some more wonderful
mini release goodies to show you
I stamped this cute dragon in black ink and coloured him/her with 
Copic Markers
B37, B34, B45, B23, BG49, BG45, BG53, YR15, Y35

...then I cut the image out and set it aside.

I die cut a piece of watercolour card with the second largest 

...then I dabbed some blue ink onto my glass mat, sprayed it with water and pressed the die cut card onto it to create the inky background.

I cut a 10.5cm x 13.5cm rectangle of 
Mermaid 6x6 Paper
and layered the dragon and the inky background onto it with a pice of white cheesecloth.

I stamped sentiments from the 
Dragon Water Fun Clear Stamp
set onto the background with grey ink.

Finally I added some blue sequins.
 Ingredients from Whimsy Stamps

Thank you for popping by today!

I hope you are all managing to stay safe and healthy in these unsettling times!

Happy Crafting
From Sue…xxx

*NEW Dragon Water Fun Clear Stamps - Whimsy Stamps  *NEW FaDoodles Frames Scalloped Rectangles Die Set - Whimsy Stamps
6x6 Paper Pack - Mermaid - Whimsy Stamps

Other Ingredients
Make it Colour Blending Card by Elaine Hughes Marker Geek
Ink on 3 Blackout Detail Hybrid Ink Pad
Water Colour Card
Catherine Pooler Ink Pad in Suede Shoes
Cheese Cloth
Taylored Expressions Summer Night Sequins


Please note that in order to assist with the running of this blog I do use affiliate links from time to time and there may be some in this post, denoted with a *.  I only work with products I love and my opinions are my own.
Please see my About Me page for more information.

Saturday, 27 June 2020

Bee Hap-Bee! - Whimsy Stamps...

Hello everyone!

I hope you are having a good weekend!

I'm back today to show you some more
mini release gorgeousness!

I have used the fabulous 

First I created the card background by cutting a 10.5cm x 13.5cm rectangle of white card with different sized dies from the 
Nested Hexagon Die Set

I then cut a second rectangle of card the same size and blended distress ink where the hexagonal apertures would be.  I flicked some water over the ink to create a bit of texture.

I fixed the die cut panel to the inky background with
Foam Tape

Then I stamped the gorgeous
 Hap-Bee Birthday Clear Stamps
 in black ink, coloured them with Copic Markers and cut them out.

Copic Markers
YR18, YR16, YR04, Y17, Y15, Y13, N9, N7, N4, BG53, BG10, BG0000

I added some glitz to the wings by using Mod Podge and Crystal Glamour Dust!

I stamped some sentiments from the 
Hap-Bee Birthday Clear Stamps set
onto the design with grey ink.

Finally I fixed the Hap-Bee bees to the card design with
Foam Tape
as shown.
  Ingredients from Whimsy Stamps

Thank you for popping by today!

I hope you are all managing to stay safe and healthy in these unsettling times!

Happy Crafting
From Sue…xxx


*NEW Hap-Bee Birthday Clear Stamps - Whimsy Stamps  Nested Hexagon Die Set - Whimsy Stamps

Crafty Foam Tape White - Whimsy Stamps

Other Ingredients
Watercolour Card
Distress Oxide Ink Pad in Salty Ocean
Make it Colour Blending Card by Elaine Hughes Marker Geek
Ink on 3 Blackout Detail Hybrid Ink Pad
Catherine Pooler Ink Pad in Twilight


Please note that in order to assist with the running of this blog I do use affiliate links from time to time and there may be some in this post, denoted with a *.  I only work with products I love and my opinions are my own.
Please see my About Me page for more information.

Friday, 26 June 2020

Gothic Die Set - Whimsy Stamps Fresh Friday

Happy Fresh Fri-yay friends!

While you are reading this hubby and I are on our way to our beloved Dorset to spend the day sorting out our caravan in preparation for our summer break next month!

It's going to be a mad and busy day but soooooo worth it when we are tucked up on the south coast for most of July and all of August! 

...anyways...

I'm here today to show you this week's 
Fresh Friday 
project! 

I LOVE Fresh Friday - this is when we mix it up a bit by using some older and newer
goodies together!
Such FUN!

This week I have used  
This card is a bit different for me but I really loved putting it together!

I blended Distress Oxide Inks over a panel of card which I had cut to fit just inside the

I then used the
to stamp
and heat emboss over the blended inks in white.

I splattered the background with water and Perfect Pearls and fixed the design to the 
slimline die cut card. 

Next I die cut a set of angel wings and a halo in white card and vellum using the

I splashed water and Perfect Pearls over the wings and attached them to the background with a twine bow as shown.

I stamped a sentiment from the 
in grey ink in the bottom right hand corner of the card design.

I finished the design by adding some 
I really loved making this card, I think it has so any possible uses!

Ingredients from Whimsy Stamps
Whimsy Inspirations Blog 
at the gorgeous cards by the rest of the Whimsy Stamps Creative Team – and then follow that with a trip to 
Whimsy Stamps 
store for some essential retail therapy!

Thank you for popping by today!

I hope you are all managing to stay safe and healthy in these unsettling times!

Happy Crafting
From Sue…xxx

Messy Mesh Background Rubber Cling Stamp - Whimsy Stamps Slimline Marquee Die - Whimsy Stamps  
Gothic Die Set - Whimsy Stamps  Sympathy So Deeply Sorry Clear Stamps - Whimsy Stamps
 Sparkletz - Crystal Hearts - Whimsy Stamps

Other Ingredients
Watercolour Card
Distress Oxides in Evergreen Bough, Shaded Lilac, Worn Lipstick, Scattered Straw
Colorbox Frost White Ink Pad
WOW Embossing Clear Gloss Powder
Twine


Please note that in order to assist with the running of this blog I do use affiliate links from time to time and there may be some in this post, denoted with a *.  I only work with products I love and my opinions are my own.
Please see my About Me page for more information.