Hello Friends,
Happy Thursday!
It's Sue here today with a really fun tutorial involving Copic refills and shaving foam and some gorgeousness from
Dies To Die For!
Dies To Die For!
I have seen marbling tutorials before but they have always been with different colouring mediums so I thought I would see what happened when I tried it with Copics!
I got really excited when the technique worked and my card ended up with a beautiful marbled pattern! (My craft room smelt lovely too for a while from the shaving foam)!
The items I used for this marbling technique are
a foil tray, a can of inexpensive shaving foam, glossy photo paper, Copic refills B34, BG13 and V15, a wooden skewer, a plastic ruler, baby wipes.
I sprayed the foam generously onto the foil tray...
Still holding onto the corner, I lifted the card off the foam.
I used a ruler to scrape the excess foam off the card
After a few minutes I wiped the card with a baby wipe.
You don't need to throw the foam away, you can add some more ink and repeat the technique several times until the foam has all gone.
This background made me think of unicorns, so, here is the card I made with it.
Ingredients used from
Dies To Die For
Stamps - Stamping Bella - Set of Unicorns
Dies - Stamping Bella - Set of Unicorns Cut It Out Die
My Favorite Things - Die namics - Stitched Circle Frames
Embellishments - *New* Your Next Stamp - Watermelon Party Sparkly Gumdrops
Other - My Favorite Things - Hybrid Ink Pad in Cement Grey
Other Ingredients
Sue...xxx
Don't forget to pop straight to the Dies To Die For inspiration blog to look at the lovely DT creations there, and then straight to Dies To Die For for some essential retail therapy!
The items I used for this marbling technique are
a foil tray, a can of inexpensive shaving foam, glossy photo paper, Copic refills B34, BG13 and V15, a wooden skewer, a plastic ruler, baby wipes.
I sprayed the foam generously onto the foil tray...
then I added drops of Copic refills...
B34
BG13
V15
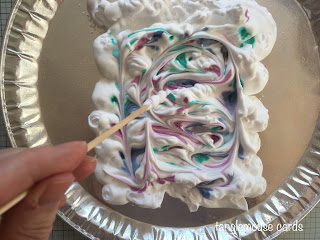
Then I used a skewer to swirl the ink around in the shaving foam...
until it looked something like this.
The next steps are the exciting part!
I press the card down, glossy side down, into the foam, press quite hard until the foam squeezed out of the side of the card.
then I held the card by the corner and rotated it 360 degrees across the top of the foam.Still holding onto the corner, I lifted the card off the foam.
I used a ruler to scrape the excess foam off the card
After a few minutes I wiped the card with a baby wipe.
You don't need to throw the foam away, you can add some more ink and repeat the technique several times until the foam has all gone.
This background made me think of unicorns, so, here is the card I made with it.
Dies To Die For
Stamps - Stamping Bella - Set of Unicorns
Dies - Stamping Bella - Set of Unicorns Cut It Out Die
My Favorite Things - Die namics - Stitched Circle Frames
Embellishments - *New* Your Next Stamp - Watermelon Party Sparkly Gumdrops
Other - My Favorite Things - Hybrid Ink Pad in Cement Grey
Other Ingredients
Make It Colour Blending Card by Elaine Hughes - Marker Geek
Glitter Card by Crafter's Companion
Copic Markers
Manes - V17, V15, V12, RV55, RV63, RV52
Wings - B66, B34, B21
Horns - All of the above plus BG57, BG11, BG10
Unicorn bodies - W2, W1, W0, W00
Thank you for popping by,
Happy creating!
love from
Sue...xxx
Don't forget to pop straight to the Dies To Die For inspiration blog to look at the lovely DT creations there, and then straight to Dies To Die For for some essential retail therapy!


3 comments:
Wow, fabulous tip and a lovely effect. GORGEOUS xx
beautiful card.
beautiful card.
Post a Comment