Saturday 30 October 2021

Whimsy Stamps - ATC Book Die and Eye Scream Stamps

 Happy Halloween weekend ghoulfriends! 

Creepy greetings are being sent your way!

My final halloween creation this year was fa-BOO-lous fun to make!
The ATC Book is made with card with Distress Inks blended over it, (link to tutorial at the end of this post), and black cardstock.

Open the book if you dare - cue lots of creepy laughter!!!
Ingredients from Whimsy Stamps

Thank you for popping by today!
Happy haunting and have a SPOOK-tac-u-lar Halloween!
Please stay safe if you are out Trick or Treating!
from Sue...xxx

**NEW ATC Book Die Set - Whimsy Stamps Eye Scream Clear Stamps - Whimsy Stamps

Ingredients from Dies To Die For

Other Ingredients
 
Eyes - R59, R46, Y38, Y17, T5, T3, T0
Wings - BV29, BV25, BV23
Bandages - E81, E43

Strathmore Bristol Smooth Vellum Card
*Distress Oxide Ink Pads - Hickory SmokeRusty Hinge and Antique Linen
Mica Powder (Perfect Pearls)
300gsm Black Card
White and Black Acrylic Paint
Gemini Jnr Die Cutting Machine


Follow the link
for my background tutorial

Please note that in order to assist with the running of this blog I do use affiliate links from time to time and there may be some in this post, denoted with a *.  I only work with products I love and my opinions are my own.
Please see my About Me page for more information.


Friday 29 October 2021

Quick Cards with Vintage Poinsettia Clear Stamps - Whimsy Stamps

 Happy Fri-YAY friends!

If you are anything like me then despite your best intentions you end up doing nearly everything at the last minute!

I've always been the same - I'm approaching my sixth decade - and there ain't no way I'm likely to change the habit of a lifetime!  (:  

To save me (a bit) from flying by the seat of my pants I have designed a set of Christmas cards which are incredibly straightforward and more importantly quick to make. 
I used my current favourite stamp set

I created a set of smallish (10cm x 10cm square) cards in a variety of bold colours with the beautiful poinsettia stamped heat embossed in gold.

I added a stamped and die cut sentiment and finished the card off with a few gold sequins.

...truly simples! 
Ingredients from Whimsy Stamps

Thank you for visiting me today, take care of yourselves and have  a super weekend!
from Sue...xxx


**NEW Vintage Poinsettia Clear Stamps Quick Strips Die Set - Whimsy Stamps

WOW Embossing Slow Drying Embossing Pad
WOW Gold Embossing Powder
Gemini Jnr Die Cutting Machine

Please note that in order to assist with the running of this blog I do use affiliate links from time to time and there may be some in this post, denoted with a *.  You can use these links at no cost whatsoever to yourself. 
I only work with products I love and my opinions are my own.


Thursday 28 October 2021

Decorate a Tree Die Set and ATC Sleigh Ride - Whimsy Stamps

Hello everyone,
I hope this week is being kind to you!

Today's card was a lot of inky fun!
I had an idea in my head when I started this card - you know how that turns out - right???
Anyway, I was pretty happy with the result in the end!

I used a couple of lovely new 
products to make this card teamed up with a Slimline Die from last Christmas

First though I created some inky backgrounds to die cut the trees from with a selection of green Distress Oxides, water and mica powder.  I'll pop a link to a tutorial at the end of this post showing how I make my backgrounds.

The card background and the frame are created in the same way but with only one ink colour - Tumbled Glass.

I stamped and heat embossed in silver the gorgeous 

The card was put together as shown in the pic...
Ingredients From 
Whimsy Stamps*

Thank you for popping by today - look after yourselves and....
Happy creating
from Sue...xxx

**NEW Decorate a Tree Die Set **NEW ATC Sleigh Ride Clear Stamps Slimline Scenic Countryside Die - Whimsy Stamps

Ingredients From Dies To Die For

Other Ingredients
Strathmore Bristol Smooth Vellum Card
Tumbled Glass, Twisted Citron, Peacock Feathers, Evergreen Bough
White Acrylic paint
Honey Doo Crafts White Opal Mica Powder
Distress Splatter Brush*
WOW Embossing Slow Drying Embossing Pad
WOW Silver Embossing Powder
300gsm White Card
Gemini Jnr Die Cutting Machine

Follow the link
for my inky background tutorial!

Please note that in order to assist with the running of this blog I do use affiliate links from time to time and there may be some in this post, denoted with a *.  You can use these links at no cost whatsoever to yourself. 
I only work with products I love and my opinions are my own.


Wednesday 20 October 2021

Whimsy Stamps - Vintage Poinsettia

 Hello everyone

Today is the start of the wonderful
Christmas Releases.

...and there awesome beautiful products which just shout
Christmas Holidays - like poinsettias!
I made this card with a gorgeous new stamp set and used my much ignored watercolour paints!

I heat embossed the poinsettia in gold which helps contain the paint and added some white and gold dots.

The Merry sentiment is die cut gold glitter card.
I have already made a lot of cards with the 
it is right up my street!

I hope you like it too!
Ingredients from

Thank you for popping by today!
Take care and Happy Crafting!
from Sue...xxx

**NEW Vintage Poinsettia Clear Stamps Merry Large Word Die - Whimsy Stamps

Other Ingredients

Permanent Alazarin Crimson,Hookers Green, Quinacridone Rose, Manganese Blue, Hansa Yellow Medium, 
WOW Embossing Pad Slow Drying
WOW Gold Embossing Powder
White and Gold Frantage 


Please note that in order to assist with the running of this blog I do use affiliate links from time to time and there may be some in this post, denoted with a *.  I only work with products I love and my opinions are my own.
Please see my About Me page for more information.

Saturday 16 October 2021

Nevermore Papers and Hourglass Die - Whimsy Stamps

Hello friends!

I'm back to day with some more freaky fun!
I have created an inky spooky scene with some fa-BOO-lous 
Whimsy Stamps goodies!

The background and the dripping blood are created with Distress Oxides - I'll pop a link to my ink blending tutorial at the end of this post!

The hourglass is created with what is quickly becoming my favourite set of papers
and the brilliant and unique

I added some Bats and a wolf from a couple of other Halloween Die Sets, 
and 

The sentiment is from the 
Ingredients from Whimsy Stamps

Thank you for popping by today!
I hope you have a SPOOK-tacular weekend!
from Sue...xxx


**NEW Slimline Hourglass Die Set - Whimsy Stamps  **NEW 6x6 Paper Pack - Nevermore - Whimsy Stamps
Dracula Going Batty Die Set - Whimsy Stamps Monster Parade Die Set - Whimsy Stamps Feed Me Clear Stamps - Whimsy Stamps


Ingredients from Dies To Die For

Other Ingredients

Strathmore Bristol Smooth Vellum Card
Mica Powder (Perfect Pearls)
300gsm Black Card
White and Black Gesso
Gemini Jnr Die Cutting Machine

Follow the link
for my background tutorial

Please note that in order to assist with the running of this blog I do use affiliate links from time to time and there may be some in this post, denoted with a *.  I only work with products I love and my opinions are my own.
Please see my About Me page for more information.

Thursday 14 October 2021

Eye Scream! - Whimsy Stamps

 Hello everyone...

OH MY WORD!  

I am ridiculously over excited by today's project, I literally can.not.wait. to share it with you!

I thought a mask would be such fun to make and use if you are a trick or treater!

I blame the terrifying film 'The Masque of The Red Death' for giving me this idea! 

The Masque is made in black card die cut with the fa-boo-lous

I cut the lens with an oval die from the 

The inky background is made with blended Distress Oxides, I'll pop a link to a tutorial at the end of this post for you.

I used a stamp from the spook-tacular
which I coloured with Copic Markers - I'll pop  a list of the colours I used at the end of this post.

The eyes are attached to the mask with wobble springs!

Finally I painted a skewer with black paint and fixed it to the side of the masque with tape.


I think this design would work equally as well as a slimline card if you did nt want to make a masque!

Ingredients from Whimsy Stamps 

Thank you for popping by today...

Happy haunting!
from Sue...xxx

**NEW Slimline Hourglass Die Set - Whimsy Stamps **NEW Antique ATC Frames Die Set - Whimsy Stamps Eye Scream Clear Stamps - Whimsy Stamps

Ingredients from Dies To Die For

Other Ingredients
 
Eyes - R59, R46, Y38, Y17, T5, T3, T0
Bandages - E81, E43

Strathmore Bristol Smooth Vellum Card
*Distress Oxide Ink Pads - Ripe Persimmon, Candied Apple, Fired Brick
Mica Powder (Perfect Pearls)
300gsm Black Card
White and Black Gesso
Wobble Springs
Gemini Jnr Die Cutting Machine

Follow the link
for my background tutorial

Please note that in order to assist with the running of this blog I do use affiliate links from time to time and there may be some in this post, denoted with a *.  I only work with products I love and my opinions are my own.
Please see my About Me page for more information.


Wednesday 13 October 2021

Pumpkin Spice Pandas - Whimsy Stamps

Hello everyone,

I'm back today with some really super new release products from wonderful

Pumpkin Spice Pandas Clear Stamps by Krista Hiej-Barber
and quite possibly the cleverest slimline die ever!
plus a gorgeous embossing folder

This fall feel card was really good fun to make! 

The 
is FAB-U-LOUS!  
**NEW Slimline Twisty Frame Die Set
The frame edges are cut in two parts so that the slotted front part can be layered onto a different coloured background, plus each edge is cut separately - and there are a selection of little decorative circles for the corners - sheer genius from lovely Denise and Deb who designed this!  

I have used leftover pieces of inky card for the coloured part of my frame.  
(I knew there was a reason I never throw inky bits away)!

The pandas are coloured with Copic Markers - I'll pop a list of the colours I used at the end of this post for you.


Ingredients from Whimsy Stamps  
Thank you for popping by today!
I hope you are all enjoying the beautiful autumnal season!
Happy crafting - from Sue...xxx


**NEW Pumpkin Spice Pandas Clear Stamps **NEW Slimline Twisty Frame Die Set **NEW Slimline Embossing Folder - Sweater


Ingredients from Dies To Die For

Other Ingredients
 
Pandas - E49, E47, E44, E43, E41, E40, T9, T7
Do-Nut/Coffee Cup Pumpkin  - Y26, Y19, Y23, TR18, YR68, Y38
Scarf/Coffee Cup Trim - R27, R17, R14, RV21, RV10, RV0000

Strathmore Bristol Smooth Vellum Card
Distress Oxide Ink Pads - Spiced Marmalade, Fired Brick, Barn Door
Mica Powder (Perfect Pearls)
Bazzill Basics Kraft Card
Copic Opaque White
Gemini Jnr Die Cutting Machine


Please note that in order to assist with the running of this blog I do use affiliate links from time to time and there may be some in this post, denoted with a *.  I only work with products I love and my opinions are my own.
Please see my About Me page for more information.


Sunday 10 October 2021

Whimsy Stamps - Leaf Border Stamp and Die Combo...

Happy Sunday everyone!

I hope you are enjoying your weekend!

We have a mini release today at 
...and I have been playing with a beautiful new product...
To make my card I splashed come Lindy's Stamp Gang Magic Powders
onto a piece of Watercolour card and heat embossed the Leaf Frame over it in gold.

I then used the die to cut the design out.

I stamped and also heat embossed in gold, a sentiment from the
You're My Favorite Clear Stamps Set onto a piece of brown card and placed that behind the frame.  I fixed the frame to the card background with foam tape.

Finally I added some dots with a gold gel pen.
Ingredients From Whimsy Stamps

Thank you for visiting!
Have a super Sunday and ... Happy Crafting!
from Sue...xxx

**NEW Leaf Frame Rubber Cling Stamp and Die Combo You're My Favorite Clear Stamps - Whimsy Stamps 
Crafty Foam Tape White - Whimsy Stamps

Other Ingredients
Watercolour Card
Lindy's Stamp Gang Magical Powders - Hag Wart's Orange, C'est La Vie Cerise
WOW Embossing Slow Drying Pad
Wow Gold Embossing Powder
Brown Cardstock from Papermill Direct
Gold Gel Pen
Gemini Jnr Die Cutting Machine

Please note that in order to assist with the running of this blog I do use affiliate links from time to time and there may be some in this post, denoted with a *.  You can use these links at no cost whatsoever to yourself. 
I only work with products I love and my opinions are my own.
Please see my About Me page for more information.


Tuesday 5 October 2021

Gargoyle and Friends - Whimsy Stamps

Hello everyone,

I'm on a roll this month!

I love the opportunities for creativity that Autumn and Halloween bring and I am really enjoying myself! 

...I do hope I'm not boring you all! (;

I'm back today with a really fun stamp set by Dustin Pike for 
This was such fun to make!

I'll pop a link to a tutorial I did for a very similar background at the end of this post along with the Copic colours I used!
Ingredients from Whimsy Stamps*

Thank you for popping by today!
Stay safe everyone and happy crafting,
from Sue...xxx

**NEW Gargoyle and Friends Clear Stamps **NEW Slimline ATC Windows Die Set - Whimsy Stamps Slimline Film Strip Die - Whimsy Stamps

Ingredients from Dies To Die For

Other Ingredients
 
Gargoyle - BV29, BV25, BV23, C2, C1, C00
Pumpkin - E19, YR18, YR68, Y18
Skull & Candle E81, E41, E40

Strathmore Bristol Smooth Vellum Card
*Distress Oxide Ink Pads - Hickory Smoke, Spiced Marmalade and Antique Linen
Mica Powder (Perfect Pearls)
300gsm White Card
Copic Opaque White
Gemini Jnr Die Cutting Machine
Stickles Glitter Glue in Black

Follow the link
for my background tutorial

Please note that in order to assist with the running of this blog I do use affiliate links from time to time and there may be some in this post, denoted with a *.  I only work with products I love and my opinions are my own.
Please see my About Me page for more information.


Monday 4 October 2021

Stamping Bella - Don'ttalktomebeforemycoffeeaBella!

 Happy Monday friends...xxx

Sometimes it is so nice to just take a deep relaxing breath and do something you absolutely LOVE!

In my case that is keeping myself occupied with a colouring challenge! 


Ingredients from Dies To Die For

Thank you for popping by!
Happy Crafting ...
from Sue...xxx

Other Ingredients
Copic Markers
Skin - E13, E11, E01, E00, E0000
Hair - E27, E25, E23, E53
Tee Shirt YR23, Y17, Y18
Leggings - E19, E09, E08, R08
Mug and Bag - BG49, BG15, BG13, BG23 
Chair - YR23, Y17, Y18, YG99, G99, YG95, YG93
Ground - E53, E51, Colourless Blender

Caran d'Ache Luminance Pencils in Sepia, Anthraquinoid Pink, Raw Umber


Sunday 3 October 2021

Whimsy Stamps Halloween - World Cardmaking Day 2021

 Happy Sunday friends!

We're having fun at Whimsy Stamps today for World Cardmaking Day!


Follow this link to join in on Facebook!

This is the card and tutorial I have created especially for the event!

A Frightful Night Slimline Concertina Card

Sue Hastead – Whimsy Creative Team


Ingredients from Whimsy Stamps

6x6 Paper Pack - Nevermore

Dracula’s Coffin Die Set

Dracula Going Batty Die Set

Haunted Word Die Set

Monster Parade Die Set

Boo Die Set

Grass and Cloud Edger Die Set


Other Ingredients

Black Cardstock

Black Glitter or Sparkle Card

Card Suitable for Mixed Media – I used Strathmore

Distress Oxides in Hickory Smoke, Pumice Stone and Antique Linen, Black Soot

Mica Powder

White Acrylic Paint

Vellum


1. Cut a piece of black cardstock to 10.5 x 8 inches


2.  Score the card vertically at 3.5 and 7 inches


3.  On the left hand side of the card make a pencil mark 3.5cm up from the bottom.  Draw a diagonal line from the mark up to the top left hand corner.


4.  Cut along the diagonal line and discard the upper portion.


5.  Fold and crease the scored lines as shown.


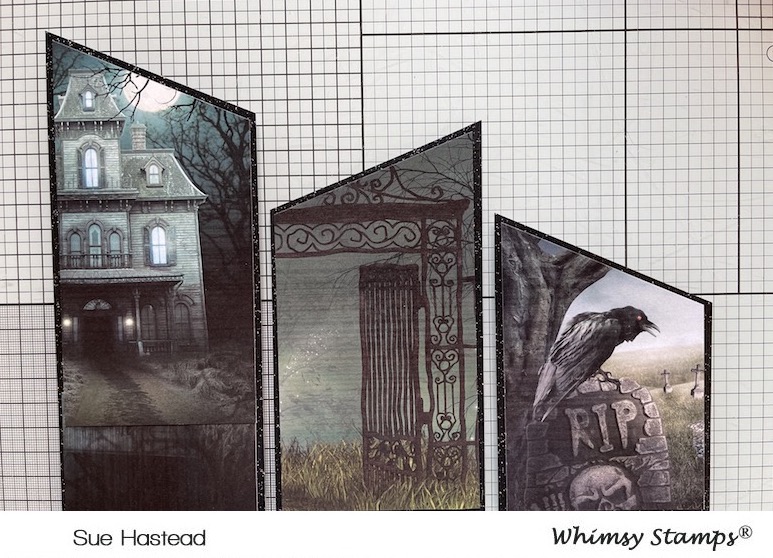
6.  Create three panels of black sparkle or glitter card to fit just inside each panel of the concertina card.  These will each be 3 and 4/8ths of an inch wide and you will need to measure the height of each panel and cut the top diagonally to fit. 


7.  Repeat step 6 to cut and fix the Nevermore paper to each panel and then fix the panels to the concertina card blank.


8.  Blend Hickory Smoke Distress Ink across a third of a piece of 6 x 8 inch mixed media card.  


9.  Repeat stage 8 with Distress Oxide in Pumice Stone…


10.  …and repeat again with Antique Linen…


11.  Mix some mica powder with water and splatter it over the inky card.  Allow to dry.  If you are impatient like me you can speed this up with a heat tool!  Repeat the splatter process with white acrylic paint and Distress Oxide in Black Soot.


12.  You should end up with a piece of card which looks something like this.


13.  From the inky card die cut a selection of the spooky dies in the ingredients list.  Die cut some ghosts with vellum.


14.  Distress the edges of the inky die cuts with Black Soot Distress Ink.


15.  Finally, enjoy creating your spooky card by adding the die cuts as shown!


I added a strip of black card die cut with the grass edger along the bottom of the Dracula and Graveyard panel.  I completely forgot to photograph that but hopefully you can see it in the photos.


Thank you so much for popping by today!


Happy Spooky Crafting friends!

from Sue...xxx


**NEW 6x6 Paper Pack - Nevermore - Whimsy Stamps Dracula's Coffin Die Set - Whimsy Stamps Dracula Going Batty Die Set - Whimsy Stamps

Haunted Word Die Set - Whimsy Stamps Monster Parade Die Set - Whimsy Stamps Boo Die Set - Whimsy Stamps

Grass and Cloud Edger Die Set - Whimsy Stamps


Affiliate links are included in this post and can be used at no cost to you