Friday 28 May 2021

Stamping Bella - 'I Do', Brett and Brenda Get Married

 Happy Fri-Yay friends!

I hope the week has been kind to you and you have happy plans for this Bank Holiday Weekend!

Today I have some wedding invitations to show you!

I don't generally take commissions but I simply could nt say no to my lovely friend and her now hubby!

After some very easy going consultation we decided to use some beautiful stamps from
and a sentiment from
...and here's a close up for you...
I love the elegance and simplicity of my friend Kate's choice.  The clean and simple designs along with the coloured images works perfectly in my view!

The images were stamped in black ink onto card suitable for alcohol markers and then coloured with Copic Markers.  (I'll pop a list of the colours I used at the end of this post for you).

I cropped Brett and Benda to make a smaller design which worked well considering both designs together.

Important note here if you consider something similar - I used the same white card to create the layers as I used for the coloured images.  

Not all white card is the same colour and hue - I discovered this ages ago in an horrendous 'white on white' card challenge which looked awful in the end because I had used different card textures and the whites were a mile off when looked at together!

I stamped the sentiments in grey ink as it looked a little gentler than using black.
Ingredients from Dies To Die For 
(Overseas Friends, you can buy direct from the craft companies listed below)
Thank you for popping by today.

Sending everyone of you the very best wishes for super and hopefully sunny Bank Holiday Weekend!

Happy creating from Sue...xxx
Other Ingredients

Copic Markers
Brett - Skin E04, E11, E01, E000
Hair - T3, T1, T0
Suit - E74, E71, E70
Brenda - Skin E04, E11, E01, E000
Hair - YR24, YR21, YR20
Dress - BV31, C00, 0 Colourless Blender
Flowers - YR68, YR38, Y17, RV29, RV63, BG49, BG32, BG11, R27, R17, R01, YG25, YG03, YG21
Close Ups
Shirt - R21
Dress - E41, E40, 0 Colourless Blender

Quickie Glue Pen
DecoArt Crystal Glamour Dust


Thursday 27 May 2021

Warm Fuzzies - Whimsy Stamps

Hello everyone...

I'm flying by today with my second Christmas card of the month - go on - admit it - you had money on me not keeping up with the two Christmas card a month thing did n't you!  (:  (:  (: 

I have made a card with a fun stamp set from
Whimsy Stamps
Warm Fuzzies Clear Stamps (Deb Davis Amped2Stamp)
This design is stamped on 
Strathmore Toned Grey Paper and coloured with
 (I'll put a list of the colours at the end of this post for you).

I have die cut the design with the  
and layered it onto a piece of 
Ingredients from Whimsy Stamps
Warm Fuzzies Clear Stamps* (Deb Davis Amped2Stamp)

Thank you for visiting today!
Happy Creating from Sue...xxx

Warm Fuzzies Clear Stamps - Whimsy Stamps Wonky Stitched Rectangles Die Set - Whimsy Stamps
6x6 Paper Pack - Comics - Whimsy Stamps

Other Ingredients
White Gel pen

Skin - Sepia, Sepia 50%, Dk Flaesh, Burnt Ochre 10%, Brown Ochre 10%
Beard - All the French Greys!
Red - Perylene Brown, Permanent Red, Terracota
Fur - White, Violet Grey
Scarf - Burnt Ochre, Yellow Ochre, Golden Bismuth
Puppy - Sepia, Carmine Lake, Brown Ochre, Buff Titanium
Ground, Dk Indigo, Slate Grey, Silver Grey, White


Please note that in order to assist with the running of this blog I do use affiliate links from time to time and there may be some in this post, denoted with a *.  You can use these links at no cost whatsoever to yourself. 
I only work with products I love and my opinions are my own.

Friday 21 May 2021

Whimsy Stamps - Mermaid Escape and Wonky Windows

Happy Friday friends,

I hope you've had a good week this week!  The weather in the Gloucestershire has been awful which is a mixed blessing because at least it makes for plenty of crafty time! (:

I have made a Mer-May card using a fabulous new release die from 
and mixing it up with an older goodie - 
I made a shaker card which is something I haven't done for aaaages! - the Wonky Window dies are perfect for Shaker cards!

I created two inky background with Lindy's Stamp Gang Magic Powders

I then die cut one inky piece and used the other for the card background.

I stamped the gorgeous mermaid directly onto the background and coloured her with Copics.  (You can colour Copics over watercolour but if you are uncertain please do your own swatch test first)!

I then created the shaker part of the card using heavy weight acetate, Sparkletz and Sprinkletz.

I stamped the sentiment from the Mermaid Escape Stamp Set onto one of the panels I saved when I die cut the wonky window and then placed the panel back in the aperture.

Finally I added some Starry Sky Sparkletz.
Ingredients from Whimsy Stamps

Thank you so much for popping by today!

Look after yourselves and have a good weekend
Happy Creating! - from Sue...xxx

**NEW Wonky Window 4 Die - Whimsy Stamps Mermaid Escape Clear Stamps - Whimsy Stamps
Sprinkletz - Fish Tank - Whimsy Stamps Sparkletz - Snow Crystals - Whimsy Stamps
Sparkletz - Starry Sky - Whimsy Stamps


Other Ingredients
Watercolour Card
Heavy Acetate by Stix2
Gemini Jnr Die Cutting Machine

Skin - E04, E11, E00, E000
Hair - BV02, BV13, BV04, BV17, BV29, white gel pen 
Tail - BV02, BV13, BV04, BV17, BV29, BG11
Clam Bra - C3, C1, C0


Please note that in order to assist with the running of this blog I do use affiliate links from time to time and there may be some in this post, denoted with a *.  You can use these links at no cost whatsoever to yourself. 
I only work with products I love and my opinions are my own.

Thursday 20 May 2021

To Bee or Not to Bee - World Bee Day 2021

Hello everyone,

Happy World Bee Day 2021!

I have made a card to celebrate the bee-u-ti-ful Bee with a bee-u-ti-ful stamp set from

It was so lovely making this card - It has some of my favourite things, Kraft card, a simple layout, pencil colouring and sparkle!

I used Arches White Drawing Paper and Prismacolor Pencils, I'll pop a list of the colours I used at the end of this post for you.
Ingredients from Whimsy Stamps
Hello Bear Clear Stamps by Deb Davis (Amped2Stamp)

thank you for popping by today! 
You can find out more about apiariculture and World Bee Day by following the ink 

Happy creating from Sue...xxx

Hello Bear Clear Stamps - Whimsy Stamps Quilted Rainbow Inlaid Die - Whimsy Stamps Quick Strips Die Set - Whimsy Stamps
 DecoArt® Glamour Dust - Whimsy Stamps


Other Ingredients
Bazzill Basics Kraft Card
Misti Stamp Tool
Gemini Jnr Die Cutting Machine
Collall All Purpose Glue
Quickie Glue Pen

Prismacolor Pencils Used
Bear - Dark Umber, Dark Brown, Sienna Brown, Burnt Ochre, Golden Rod, Yellow Ochre, Sand
Bee Hive - Mineral Orange, Yellowed Orange, Spanish Orange, Sunburst Yellow, Canary Yellow 
Grass - Dark Green, Olive Green, Limepeel, Yellow Chartreuse


Please note that in order to assist with the running of this blog I do use affiliate links from time to time and there may be some in this post, denoted with a *.  You can use these links at no cost whatsoever to yourself. 
I only work with products I love and my opinions are my own.
Please see my About Me page for more information.


Octopi Guys - Whimsy Stamps

 Hello everyone and Happy Wednesday!

I hope this week has been kind to you.

I have a really fun stamp set to show you today, a new release from
Whimsy Stamps

There are three Octopi Guys stamps in this set and they are real characters!
There are so many card making possibilities with them!  I decided to go with a belated Birthday Card theme.

The Octopus is stamped on Kraft card and coloured with Copic Markers, I'll pop a list at the end of this post for you.

I teamed the stamp with some other Whimsy Stamps goodies to make my card.

...and, there are also matching outline dies for this stamp set (Octopi Guys Die Set) which I have nt used here but which are useful if like me you are not a happy fussy cutter!
Ingredients from Whimsy Stamps


Thank you for popping by today,
take care and Happy Creating!
from Sue...xxx

**NEW Octopi Guys Clear Stamps - Whimsy Stamps **NEW Octopi Guys Outlines Die Set - Whimsy Stamps

Comic Speech Bubbles Die Set - Whimsy Stamps Oops Word and Shadow Die Set - Whimsy Stamps
Cheeky Sentiments Clear Stamps - Whimsy Stamps **NEW Simple Sentiment Strips Die Set - Whimsy Stamps


YG67, YG17, YG23, YG21
Y38, Y15, Y11
T3, C3, C1, C00


Please note that in order to assist with the running of this blog I do use affiliate links from time to time and there may be some in this post, denoted with a *.  You can use these links at no cost whatsoever to yourself. 
I only work with products I love and my opinions are my own.

Thursday 13 May 2021

Best Friend - Whimsy Stamps

Happy Wednesday friends.

I'm whooshing by today with a very simple card - I don't usually make this style of card so it was a very welcome change for me!  - I could get to like it! (;
I made a swoosh inky background with watercolours and cut the card into a rectangle - approx 13 x 9 cm 

I die cut some purple glitter card with the gorgeous new Whimsy Stamps
and teamed it with the 'sweet' sentiment from the new release

I used the scalloped frame from the 
and cut it down to fit along the edges of the design as shown.

Finally I added some Aquamarine Sparkletz clear drops. 
Ingredients from Whimsy Stamps

Thank you for popping by today!

Look after yourselves and happy creating
from Sue...xxx

**NEW Best Friend Word Die Set - Whimsy Stamps **NEW Doddle Frames Clear Stamps - Whimsy Stamps
 
**NEW Doodle Frames Outlines Die Set - Whimsy Stamps Quilted Rainbow Inlaid Die - Whimsy Stamps
Sparkletz - Aquamarine - Whimsy Stamps


Please note that in order to assist with the running of this blog I do use affiliate links from time to time and there may be some in this post, denoted with a *.  You can use these links at no cost whatsoever to yourself. 
I only work with products I love and my opinions are my own.


Monday 10 May 2021

Whimsy Stamps - Doodle Frames

Hello everyone,

Today's card is made with a super new stamp and die set from


Would you believe this card started off with a mainly red theme! - I changed it at the very last minute to black and Kraft!  I might try the red again another time!

I thought the Doodle Frame Stamps and Dies would look perfect with the 
(and this means I have also done one of my two Christmas Cards a month project)! (:

Thank you for visiting me today!
look after yourselves and happy creating!
from Sue...xxx

**NEW Doddle Frames Clear Stamps - Whimsy Stamps **NEW Doodle Frames Outlines Die Set - Whimsy Stamps
Slimline Card Builder Die - Whimsy Stamps Very Mice Christmas Clear Stamps - Whimsy Stamps
 **NEW Simple Sentiment Strips Die Set - Whimsy Stamps You're My Jolly Clear Stamps - Whimsy Stamps


Mouse - E44, E43, E42
Hat - W8, W6, W4, W2, YR24, YR23, Y11
Holly - YG67, YG63, R37, R35, R32


Please note that in order to assist with the running of this blog I do use affiliate links from time to time and there may be some in this post, denoted with a *.  You can use these links at no cost whatsoever to yourself. 
I only work with products I love and my opinions are my own.

Tuesday 4 May 2021

Whimsy Stamps - Mermaid Dreams - Tuesday Tutorial

  Hello everyone,

Oh my word - these Tuesdays come round quickly don't they! - I swear time is speeding up! 

Today I'm sharing a sweet, (VERY sweet)! (; tutorial!
I'm going to keep you guessing today so if you don't read ahead you'll have a nice surprise - unless you can guess what I've made! 

If like me you adore Mer-May then Whimsy Stamps has got you covered!!
I decided to try something a little different with two of the fabulous Whimsy Stamps mermaid stamp sets.
and the 
Ingredients from Whimsy Stamps

Other Ingredients
Cling Wrap
Watercolour Card
To create the inky background for my project I used (Watercolour) Sparkle Pens but you could use any sort of watercolour pens or watercolour medium for this technique. 
Black Stazon Ink
Mini Mister or Spray Bottle
Precision Scissors
Cocktail Sticks
Glue (I used a cold glue gun) 
First I placed a piece of cling wrap on my glass mat and scribbled and dotted some inks in blue, turquoise and pink onto it.
I then sprayed water onto a piece of A4 watercolour card.
I then placed the inky cling wrap onto the card, pressed it down and scrunched it up slightly.
I took the cling wrap away and this was the effect...
I repeated this with a different selection of mermaid type colours!
I ended up with two inky deliciously inky backgrounds.
Then I randomly cut the card up into about odd shaped pieces - don't overthink this, just dive in with the scissors, random is best!  I cut the card into about eight pieces in total.
I then stamped the mermaid tail from the Mermaid Dreams  stamp set onto the inky card.
I use Stazon Ink for this as it works best on top of watercolours.  It doesn't bleed and it leaves a crisp outline.
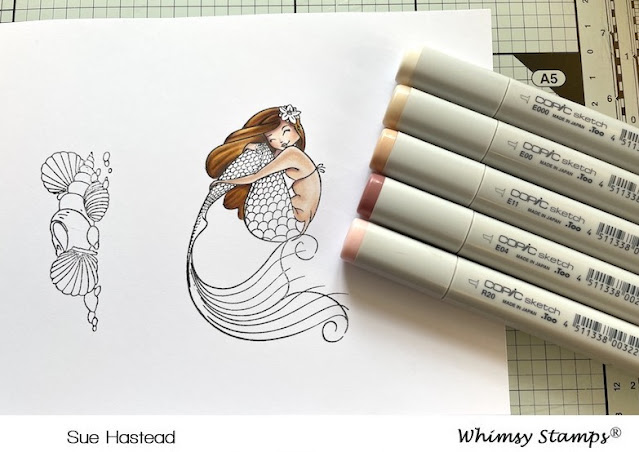
I stamped six tails in total and the gorgeous mermaid from the Lets Be Mermaids stamp set.  (You can see I also stamped the seashells but I decided not to use them this time)
I then fussy cut the mermaid tails (not my favourite part but I'm getting better at it - (I'm a bit of a muppet because I have a Scan n Cut - I'm just too lazy to get it out and set it up)!
Make sure you keep all the off cuts - you will need them later!
I coloured the mermaid with Copic Markers
Hair - E47, E39, YR27, YR24, YR21
Skin - R20, E04, E11, E00, E000
Tail - B39, BG07, BG15, BG01, BG11, YG00, White Gel Pen
I then fussy cut her...
Here's where you need the offcuts I said to save earlier! - I used the smallest and second smallest dies from the Wavy Nested Frames Die Set to cut shapes from the tail offcuts.
I then stamped a selection of sentiments from the Mermaid Dreams and Lets Be Mermaids stamp sets onto them (again with Stazon Ink)
Here is my lovely selection of tails, sentiments and a mermaid!
I used a glue gun to fix a cocktail stick to the back of each shape.  (You could use PVA but I'm impatient and I used the glue gun because it dries so quickly)!
...so, if you have n't already read ahead, can you guess what these are for! (;  ...

...well I did say it was a sweet tutorial! (:

I had a bit of a time deciding which stamp set to use for the cupcakes!  I uuuummed and aaaaaahed over using...  
Unicorn Wishes Clear Stamps - Whimsy Stamps 
or
Over the Moon Clear Stamps - Whimsy Stamps

...and I already have a few more ideas up my sleeve for halloween! (;

Thank you so much for popping by today!  I hope you've enjoyed my tutorial, it would be great to see your projects so remember to share them with us!

look after yourselves and those you love!

Happy creating from Sue...xxx

Mermaid Dreams Clear Stamps - Whimsy Stamps Let's Be Mermaids Clear Stamps - Whimsy Stamps Wavy Nested Frames Die Set - Whimsy Stamps


Please note that in order to assist with the running of this blog I do use affiliate links from time to time and there may be some in this post, denoted with a *.  You can use these links at no cost whatsoever to yourself. 
I only work with products I love and my opinions are my own.