Thursday, 31 March 2016

You are my sunshine...

Hello again lovely ones,

We have a new challenge starting today at
and it is Anything Goes (with a Sugar Nellie Image)

The prize for the lucky winner of this month's challenge is four Sugar Nellie Digital Images, and there is a second prize winner of two Sugar Nellie Digital Images from 
For today's card I have used the gorgeous Gorjuss Mini Stamp
Puddle of Love
available
from

I have stamped and cut this cutie out and coloured her with Copics.

I have set her on a partially embossed and inked background and added the happy sentiment.

Finally, I mounted the design on a strip of blue card.

and here we are...gorjuss, bringing some sunshine - hopefully!
Ingredients
Gorjuss Mini Stamp Puddle of Love from Funky Kits
Memento Ink Pad in Tuxedo Black
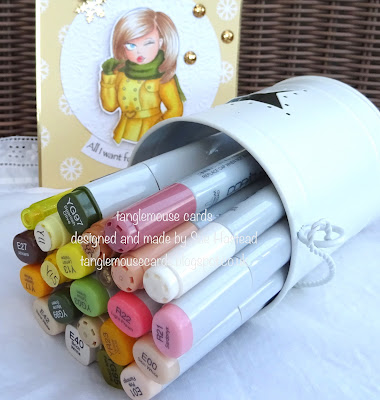
Copic Markers
Pink Paislee 'Hello' Stamp and Die Set
Archival Ink Pad in Cobalt
Marianne Snowfall Embossing Folder
Tim Holtz Distress Ink pads
3mm Foam Pads and Collall All Purpose Glue
Inks Used
Memento Ink pad in Tuxedo Black
Archival Ink pad in Cobalt
Tim Holtz Distress Ink pads in weathered wood, tumbled glass, hickory smoke
Copics - 
hair C1, C3, C5, C7
skin E11, E04, E01, E00, E000
Clothes and Brolly B14, B05, B37, YG25, YG17, YG25, C0, C1, C3
White Uni-ball Signo Gel Pen.
Thank you for visiting
Happy Crafting!

and remember to pop straight to 
to look at the lovely DT Creations there and  join in with all the fun!

from Sue...xxx


Please leave a comment if you pop by, I really appreciate them and do enjoy reading them all...xxx


Something completely different...

Good morning lovely friends.

Hope all is well with you where ever you are and what ever you are up to.

We have a new challenge starting today at 
and it is 
Dies and/or Punches.

Our sponsor this time is lovely Tracy from 
and the prize for the lucky winner is a £10 voucher.

My card today is something completely new and different for me.

I made a background with Copic Refills (in pink of course).

Then I die cut three sets of flowers with the die.  One on white card, one on a card I had rubbed with Tim Holtz Distress Crayons, and one on a piece of lovely dotty paper. 

I then stuck the outline on to the pink background.  

Then I placed the coloured petals, along with one dotty papered petal into the die cut outline.

Finally I added a die cut and embossed frame and some clear gems.  The last finishing touch was a Tim Holtz Chit Chat sticker.

and here we are - something completely different... (eeeeeek)!
Ingredients
Memory Box Splendid Clarkia Die
Glossy Photo Card
Copic Refills
Tim Holtz Distress Crayons
Die-namics Stitched Rectangle Die
Crafts Too Flowers Embossing Folder
Santoro Dotty Paper from my stash
Papermania Clear Glass Gems
Tim Holtz Chit Chat Stickers
Collall All Purpose Glue
Inks Used
Copic Refills RV52, R81 and Colourless Blender
Tim Holtz Distress Crayons - picked raspberry,  twisted citron, fossilised amber
Thank you for visiting...
Happy Crafting...


...and remember to pop straight to 
to look at the other lovely DT Creations and join in with the pink fun. 

from Sue...xxx

Please leave a comment if you pop by, I really appreciate them and do enjoy reading them all...xxx

Wednesday, 30 March 2016

All I want for Christmas is you...

Hello again everyone,
We have a new challenge starting today at
and it is 
Green or Gold
(Christmas Creations only though folks)!

Our generous sponsors this time are
with 3 of their gorgeous digital images for the lucky winner.
For my card I have used the beautiful image Diva Lisa - You
I have coloured this beautiful image with Copics and set her on an embossed circle.  I created the sentiment on my computer and managed to curve it using a fabulous tutorial that can be found HERE on my lovely friend Annette's blog - Netty's Cards

Finally I added some gold embellishments.

...and here we are, beautiful Diva Lisa, with her Christmas list all sorted!
Ingredients
Make it Colour Blending Card by Elaine Hughes (Marker Geek)
Copic Markers
Embossalicious Snowflake Embossing Folder
Gold Shimmer Domes by Papermania
Marianne Craftables Snowflake Dies
Snowflakes Digi Papers by Pink Gem Designs
Collall All Purpose Glue
Inks Used
Copics
Hair E40, E42, E33, E35
Skin E11, E04, E01, E00, E000
Clothes E27, YR23, YR17, YR15, YR13, YR11, YG99, YG97, YG95, YG03
Copic Spica in Gold and Lemon to decorate coat.
Thank you for visiting...

Happy Crafting...

and remember to pop straight to ABC Christmas Challenge to look at the lovely DT Creations there and join in the fun!

from Sue...xxx

Please leave me a comment if you pop by, I am always very happy to see them and do enjoy reading them all. 


Colour my world...

Good Morning lovely friends,

Thank you so much for all your lovely messages whilst I was 'hors de combat' - I appreciated every single one of them - you are fab!
 We have a new challenge starting today at 
and it is
Anything goes plus the option of a sketch.

We are sponsored this time by the fabulous KENNYK STAMPS and the prize is
3 DIGI'S OF THE WINNER'S CHOICE!


KennyK-Stamps-BADGE-IRockWITH-aqua

Rock Your Crafts with KennyK Stamps! 

For my card I have used the gorgeous 

I have coloured this fabulous image with copics and set her on an embossed background with a sentiment I created on my computer.

I went for a simple layout with papers from Sara Davies Signature Collection - Love and Romance and added a few colourful sequins.

...and her we are, gorgeous 'Color Me Janette' definitely making the world more colourful.
Ingredients
Make it Colour Blending Card from Elaine Hughes (Marker Geek)
Copic Markers
Papers from Signature Collection by Sara Davies - Love and Romance
Sequins from my trinket box
Sentiment made on the computer - American Typewriter and Chalk Dust Fonts
Cuttlebug Embossing Folder
Clearly Besotted Notebook Edge Die
Collall All Purpose Glue

Inks Used
Hair C3, C4, C5, C7, C9, BG11, BG13, BG15, BG18
Skin E11, E04, E01, E00, E000
Eyes B05 YG01 
Lips R22, R21, R20
Clothes B34, B37, B39, BV04, BV34, BV31, R85, R83, R81
Marker C5, C3, C1, C0, R85, R83, R81
Thank you for visiting...

Happy Crafting...

and remember to pop straight to Creative Inspirations to look at the lovely DT Creations there and join in the fun!

from Sue...xxx


Please leave me a comment if you pop by, I am always very happy to see them and do enjoy reading them all. 


Monday, 21 March 2016

All's quiet at the Mouse House...

Good evening lovely friends,

No card today just a great big apology from me - I am really far behind with my visits to all your gorgeous blogs and don't think I will ever catch up!

My lovely hubby has been ill for almost a month with a dreadful bout of 'flu and my gorgeous dogs pulled me over last week whilst I was walking them - falling over when you are 51 is no where near as much fun as falling over when you are 6!  

Life has well and truly got in the way of crafting this week and I have had to give myself a talking to! - well let's face it, we are n't negotiating world peace are we?  We are enjoying ourselves and rustling up a few super cute creations!  (ha! who am I kidding -  I am the world's worst at giving in)!

I have momentarily pressed the pause button and taken a week's break so I want to say a big thank you to Christine at In The Pink,  Carol at My Besties UK and Shirley at The Paper Shelter for all their kindness and understanding.

Normal service will be resumed after Easter and I wish you all a blessed one with those you love.

Sue...xxx

Wednesday, 16 March 2016

use your wings

Good Morning lovely friends.

We have a new challenge starting today at ABC Christmas Challenge and it is
Frills or No Frills
but...must be a Christmas creation!

Our generous sponsor this time is
and the prize for the lucky winner is a $10 gift voucher.
For today's card I have gone for 'No Frills' and used some more gorgeous stamps by Stacey Yacula from Purple Onion Designs.  I chose gorgeous Snowy - Winter Owl and Lamp Post which I cut out and coloured with Copics.

I made a wintery scene using my Copic Air System and some die cuts.  Finally I added a sentiment from Tim Holtz' Small Talk.

..and here we are, always sage advice - use your wings!
Ingredients
Snowy - Winter Owl and Lamp Post by Stacey Yacula at Purple Onion Designs
Make it Colour Blending Card by Elaine Hughes (Marker Geek)
Copic Markers
Die-namics Stitched Rectangle Dies
Lawn Fawn Stitched Hillside Dies
Picket Fence Distress Paint
Collall All Purpose Glue
Polka Dot and Glitter Card from my stash
Inks Used
Memento Ink Pad in Tuxedo Black
Copics -
Lamp Post E31, E33, E35, E37, Y11, Y15, YR23
Snowy Owl E21, E31, E33, E35, W0, W1, W3
Hat R29, R24, R14
Background YR23, R46, B69, B79, Picket Fence Distress Ink
Thank you for visiting...

Happy Crafting...

and remember to pop straight to ABC Christmas Challenge to look at the lovely DT Creations there and join in the fun!

from Sue...xxx

Please leave me a comment if you pop by, I am always very happy to see them and do enjoy reading them all. 


a change is a good as a rest...

Good morning everyone.

We have a new challenge starting to day at
and it is
Nature
So - we would like to see your gorgeous creations featuring anything to do with nature - whatever inspires you, flowers, foliage, wildlife or colour scheme.

The prize this time for the lucky winner is from
and it is a 30% discount in her gorgeous on line store.

Last week I visited my lovely crafty friends Sheila, Tracy and Angela at Pink Tulip Creations, oh my - they had just had their delivery of wonderful new Ranger products and colour me every colour - I could n't resist the new Distress Crayons by Tim Holtz.  (and a few other bits and pieces)!

Today's card is my first attempt with Distress Crayons  - there are plenty of tutorials and info on line about these scrumptious crayons thank goodness - plus the Pink Tulip ladies have done a Tim Holtz class with the man himself and very generously shared some tips with me.
I squiggled some distress crayon onto a piece of water colour card and smudged it about with my finger - moistened with a baby wipe.

I then placed a Tim Holtz stencil over the smudged crayon and rubbed gently over the whole surface again with a baby wipe.

When I removed the stencil - tadah! - some magic had taken place and the stencil shape was left behind.

Then I lived dangerously and splattered some Picket Fence Distress Ink over the top using a paint brush.

Finally I added a die cut butterfly, sentiment and frame along with some sequins and here we are...

a card quite different from anything I have ever made, such fun! (however, note to my darlin' Copics - I have not forsaken you - those crayons are temptresses)!!!
Ingredients
Tim Holtz Distress Crayons in Picked Raspberry, Peacock Feathers and Seedless Preserves
Langton Watercolour Card
Tim Holtz Mesh Layering Stencil
Tim Holtz Picket Fence Distress Ink
Memory Box Vivienne Butterfly Die
Lawn Fawn Love Sentiment Die
Die-namics Rectangle Stitched Frame Die (Paper from First Edition New Bloom Collection)
Collall All Purpose Glue
Sequins from my trinket box (from The Range originally)

Thank you for visiting...

Happy Crafting...

and remember to pop straight to Creative Inspirations to look at the lovely DT Creations there and join in the fun!

from Sue...xxx


Please leave me a comment if you pop by, I am always very happy to see them and do enjoy reading them all. 


Tuesday, 15 March 2016

Don't worry...be happy...

Good Afternoon lovely friends,

Big apologies from me, I am a bit behind the plot this week, we have had a massive internet 'outage' (technical term).  Apparently Sky customers nationally have all been affected.  Funny how used we all are now to having the www at our fingertips!

So, the long and short of it is that I am so far behind, I think I am in front!  Hope to visit you all soon, please bear with me :-)

Today's card is a preview of a gorgeous new stamp by Lili of the Valley.
It is Oliver Kicking About which is available, along with the full range of Oliver and Jasmine stamps for pre-order HERE
I have have coloured Oliver with Copics and created a little scene for him to stand.  I used my new 'embossing folder and mallet' technique which I described in a previous post HERE.  I embossed the background and inked it up with some Distress Ink and a splatter of Picket Fence Ink.

I added a die cut frame and some sentiments, also part of the new launch from Lili of the Valley and available HERE

...and here we are, Rueful Oliver - a true teenager and as a Mum of two now post teenage boys, I feel quite well qualified to comment!... (He's great though ain't he, and so are my two)!
Ingredients
Make it Colour Blending card from Elaine Hughes (Marker Geek)
Copic Markers
Brickwork Embossing Folder by Crafter's Companion
Die-namics Rectangle Stitched Frame Dies
Lawn Fawn Stitched Hillsides Die
Tim Holtz Distress Ink Pad in Tea Dye and Fired Brick
Tim Holtz Distress Ink in Picket Fence
Papers from Project Life, Becky Higgins, Kraft Edition
Collall All Purpose Glue
Inks Used
Copics
Hair Y21, Y23, E33
Skin E19, E21, E11, E00, E000
Clothes & Accessories B93, B95, B97, B99, T5, E19, E07, Y15, Y17, E19, C1, C3, C5

Thank you for visiting
Happy Crafting!

From Sue...xxx

Remember to hop (-;) straight to Lili of the Valley and have a look at all the loveliness there.

You can also follow Lili of the Valley on Facebook and Pinterest and Instagram, and the wonderful Ideas to Inspire Blog is now back too, you can see it
HERE

Please leave a comment if you pop by, I really appreciate them and do enjoy reading them all...xxx


Saturday, 12 March 2016

Are you feeling Springy?

Good afternoon lovely friends,
lovely weather here to day, so after the excitement (not)! of nearly flooding at home on Tuesday, perhaps spring is finally on the way.

Today's card is a gentle reminder to you all that there is still time to enter the Spring Challenge Event at Lili of the Valley.

Just follow the link
to add your own gorgeous cards.

You have until 6pm UK time tomorrow  (Sunday 13th March) to join in the fun and there are some fantabulous LOTV goodies for the winners.
For my card I have used the sweet re released stamp

 I have coloured these cuties in Copics and used scalloped circle dies to create the layers for my card base.  The papers are from First Edition.  Finally I added some flowers, ribbon and a sentiment from Lili of the Valley's Sentiment Tag Set 24

...and here we are, I don't know what he asked but I would say yes!...xxx
Ingredients
Lili of the Valley Rubber Stamp - Bunnies In Love
Make it Colour Blending Card by Elaine Hughes (Marker Geek)
Memento Ink pad in Tuxedo Black
Copic Markers
Lili of the Valley's Sentiment Tag Set 24
Spellbinder Nestabilities Scalloped Circle Dies
Papers from First Edition New Bloom Collection
Flowers from The Hobby House
Ribbon from my stash
Collall All Purpose Glue
Inks Used
Memento Ink pad in Tuxedo Black
Copics -
Mr Bunny W0, W1, W3, W5, E8, R81
Miss Bunny RV91, RV93, RV95, W1, W3, E81, R81
Flowers YG01, YG03, YG17, RV91, R81
Background B45, B21, B00 and colourless blender
Ground W1, W3, W5
Thank you for visiting
Happy Crafting!

From Sue...xxx

Remember to hop (-;) straight to Lili of the Valley and have a look at all the loveliness there.

You can also follow Lili of the Valley on Facebook and Pinterest and Instagram, and the wonderful Ideas to Inspire Blog is now back too, you can see it
HERE

Please leave a comment if you pop by, I really appreciate them and do enjoy reading them all...xxx