Tuesday, 30 March 2021

Whimsy Stamps - Coffee Lovers Tuesday Tutorial...

 Hello everyone...

I'm here today with a set of 'one layer' coffee themed cards I designed as a gift for a coffee loving friend.  I have also made a little card pouch to put them in.

I thought that the coffee themed stamps by Whimsy Stamps were perfect for this project!
This tutorial shows how I made the cards including straightforward masking techniques which don't involve lots of fussy cutting! (Which I personally find tedious and am terrible at)!

I have used Copics to colour over Distress Inks.  As the inks are water based it is totally safe to do this but please do your own swatch tests first if you aren't sure!  I also coloured onto watercolour card, the card soaks up a lot of ink and I love the effect it gives - you can really lay down a lot of ink and I love that!
I dabbed the Tumbled Glass ink pad onto my glass mat and sprayed it with water.
...then I pressed water colour card onto the wet ink and swooshed the card about a bit until I was happy with the result.
I repeated this with the other three colours, Tumbled Glass, Dried Marigold, Pumice Stone and Ground Expresso.
I cut the cards into rectangles measuring 9cm x 11.5cm
I then stamped the coffee themed stamps Hot Sip and Coffee Break onto the inky backgrounds with black ink.
 
I placed acetate over my design to 'test stamp' the add ons to make sure they were in the correct position.
I then coloured each image with Copic Markers - E18, E17, YR27, YR14
...BG57, BG34, BG11
...R27, R05, R02
Y26, Y15, Y11
Next I mixed up a strongish wash of each ink (using the same ink I had used for the background except for this card where I chose the darker ink - Hickory Smoke).  I scrunched up a piece of kitchen towel to cover the coffee cup up and splattered the ink over the design with a fan brush which gives a really fine effect of small dots instead of splodges!
I stamped a sentiment from the Coffee Time Set onto each card in black ink.
I was really happy with how these turned out!
I could get used to making one layer cards - they look so stylish!

I decided to make a little wallet for the cards thinking that they make such a lovely little gift for a coffee loving friend.
This card holder is a doddle to make and was inspired by a visit to Pinterest!
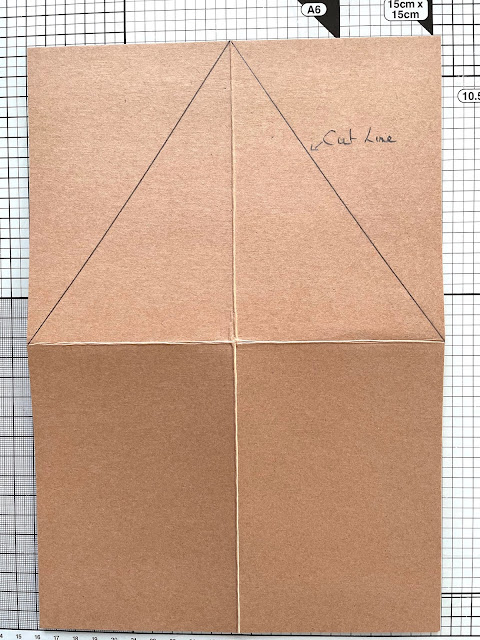
All you have to do is score a piece of A4 card in half vertically and horizontally and burnish the folds with a bone folder tool.
Then mark the folds and cut as shown above.
No glue is required, the card just folds up into a little wallet!
Finally I added some ribbon and a tag...
Ingredients from Whimsy Stamps
I used a tag die which is retired by Whimsy Stamps - I'm sorry about that!  However, you could use the fabulous 
Bookmark and Tags Die Set* instead by cutting the long bookmark die shorter to fit the stamped sentiment.

Thank you so much for popping by today!
I hope life is treating you well.
Look after yourselves and those you love
from Sue...xxx


Hot Sip Rubber Cling Stamp - Whimsy Stamps Coffee Break Clear Stamps - Whimsy Stamps 
Bookmark and Tags Die Set - Whimsy Stamps

Other Ingredients
Distress Inks* in Dried Marigold, Tumbled Glass, Pumice Stone, Hickory Smoke, Ground Expresso
Rectangle Layering Dies by Tonic Studios
Paint Brush
Copic Markers - 
Browns - E18, E17, YR27, YR14
Reds - R27, R05, R02
Yellows - Y26, Y15, Y11
Blues - BG57, BG34, BG11
Kraft Card
Brown Ribbon and Twine


In order to assist with the running of this blog I do use affiliate links from time to time and there may be some in this post, denoted with a *.  
I only work with products I love and my opinions are all my own.
Please see my About Me page for more information.

Sunday, 28 March 2021

A Honey Bunny For Easter! - Mama Elephant

Happy Sunday friends!...

Hands up! - who forgot that the clocks sprang forward an hour! /-; 

I 'm here today (an hour late)!... (:
with some simple Easter cards made with quite possibly my most favourite bunny image EVER!
from fabulous 
I coloured these cuties a while ago and finally found time to turn them into a set of Easter cards.

The Honey Bunnies are stamped in grey ink onto Bockingford Card.  I then masked them and gently inked the backgrounds with Catherine Pooler Inks.  (I'll try and remember which colours and guess them below for you).  I splattered a bit of water on the backgrounds to add texture.

I coloured the bunnies with Prismacolor pencils - it was a while ago and I did nt make a note of the colours at the time.  If you want to try this then perhaps practice some brown and grey blends first to see which you like!

I die cut the cards with a standard 7.5cm x 9.5cm rectangle die and added a sentiment from the Honey Bunny Stamp Set.

So - that's me with Easter covered! (:
Catherine Pooler Inks in

Thank you for popping by today.
Have a lovely Sunday.
from Sue...xxx

Other Ingredients
MFT Ink Pad in Cement Grey
White 300gsm Card* (for card blanks)


In order to assist with the running of this blog I do use affiliate links from time to time and there may be some in this post, denoted with a *.  
I only work with products I love and my opinions are all my own.
Please see my About Me page for more information.


Thursday, 25 March 2021

Whimsy Stamps - Butterflies and Stained Glass Scripture for Easter

 Hello everyone.

I hope this week is being kind to you.

I had such fun making an inky mess last week that have been playing with texture paste and sparkle again!

I have made a set of scripture themed cards - it meant a lot to me to make these, I'm probably not alone in saying that faith has been on somewhat shaky ground recently!
To create the backgrounds I used Magical Powders by Lindy's Stamp Gang.  I have only just discovered these little pots of gorgeousness but oh my word, if you like getting inky they are game changers!

I combined the backgrounds with some beautiful Whimsy Stamps products and have to say I did feel happy with the final designs!

Ingredients from Whimsy Stamps

Thank you for popping by today, look after yourself and those you love,
from Sue...xxx

Wonky Stitched Rectangles Die Set - Whimsy Stamps Stained Glass Scripture Sentiments Clear Stamps - Whimsy Stamps Honeycomb Drips Stencil - Whimsy Stamps

Butterflies Clear Stamps - Whimsy Stamps Slimline Card Builder Die - Whimsy Stamps Brick Pattern Stencil - Whimsy Stamps

Rounded Rectangles Die Set - Whimsy Stamps Farmhouse Basket Stencil - Whimsy Stamps

Other Ingredients
WOW Embossing Pad
WOW Clear Gloss Embossing Powder
WOW Opaque White Embossing Powder
Crafter's Companion Vellum


In order to assist with the running of this blog I do use affiliate links from time to time and there may be some in this post, denoted with a *.  
I only work with products I love and my opinions are all my own.
Please see my About Me page for more information.




Sunday, 21 March 2021

Gnome Gardeners - Whimsy Stamps

Happy Sunday and Happy Spring everyone! 

I thought the first day of spring was the perfect day to show you a gorgeous new set of gnomes by Crissy Armstrong for Whimsy Stamps
It is probably the worst kept secret ever but I LOVE colouring gnomes!

I experimented with this little chap by first creating the background with Speckled Egg Distress Oxide and then stamping and colouring him over the top.  (To avoid that pesky mask fussy cutting)! 

He's coloured with Areteza Pencils, (I'll pop the colours at the end of this post for you)

Personally I think he looks a little pale but again, I am struggling with the light conditions here and taking photos has me tearing my hair out!
Ingredients from Whimsy Stamps

Thank you for popping by today.
Wishing you all a super Sunday - with some happy crafting!
from Sue...xxx

**NEW Gnome Gardeners Clear Stamps - Whimsy Stamps FaDoodles Frames Scalloped Rectangles Die Set - Whimsy Stamps


Skin - Lavender, Earth Red, Apricot, Peaches and Cream
Beard - Elephant Grey, Mushroom Grey, Shadow Grey
Hat, Garnet Red, Venetian Red, Rose Red
Robe, Olive Green, Apple Green, Fluorescent Yellow
Shoes, Black, Onyx Black, Ash Black, Charcoal Grey
Ground, Elephant Grey, Mushroom Grey
Flower Pot - Raw Umber, Raw Sienna, Yellow Ochre
Tulip - as Hat and Gown

Other Ingredients
MFT Ink Pad in Cement Grey
Bakers Twine

In order to assist with the running of this blog I do use affiliate links from time to time and there may be some in this post, denoted with a *.  
I only work with products I love and my opinions are all my own.
Please see my About Me page for more information.

Saturday, 20 March 2021

Zen Garden - Whimsy Stamps

Hello everyone... 

Today we have a super mini release at 

I made some Mixed Media ATC style cards with a beautiful new stamp
and I I really don't know what to say about them! /-:
This is my first (and quite possibly my last)! attempt at anything like this!

I am full of admiration for all you Mixed Media Artists out there - you are incredibly creative and I don't know how you do it!  All I seemed to achieve was an incredibly messy desk and a blister on my forefinger! (:

(...also apologies for the photo fail - we are in a period of very bad light again here and I am having difficulty capturing a decent photo of anything)!
Here's how I made these cards...

Firstly I took a piece of Strathmore Bristol Vellum Card and I blended lines of Distress Oxides in Twisted Citron, Squeezed Lemonade, Spun Sugar, Shaded Lavender and Tumbled Glass from the bottom upwards.  I then sprayed it with water and let it dry.

Then I die cut the card three times with the largest 
and stamped the 
Zen Garden image onto it with black ink as shown.

Then I rubbed texture paste through a different stencil on each card and let it dry.

Next I used a red oil pastel (I use Caran d'Ache Neopastels but any would be fine- I think you could also use Distress Crayons for this if you have them), and using my finger I rubbed red hearts onto the design using a die cut made with the 
as a stencil.

I repeated this process with a black oil pastel and the Polka Dot Stencil.

I then coloured the centre of the flowers with Arteza Pencils.  (I just used three random yellow orange and red ones)

I then flicked Mica Powder mixed with water followed by white paint (I used Copic Opaque White but any would do) over the designs and let everything dry.

Finally I stamped several sentiments from the
Simple Sentiments Clear Stamps Set
onto kraft card, cut them out and fixed them to the card designs as shown.
 
Ingredients from Whimsy Stamps
Thank you for popping by....
Have a super weekend,
love from
Sue...xxx

Rounded Rectangles Die Set - Whimsy Stamps **NEW Zen Garden Rubber Cling Stamp - Whimsy Stamps Slimline Hearts Background Die - Whimsy Stamps

Honeycomb Drips Stencil - Whimsy Stamps Sun Rays Stencil - Whimsy Stamps

Brick Pattern Stencil - Whimsy Stamps Polka Dot Stencil - Whimsy Stamps

Simple Sentiment Strips Clear Stamps - Whimsy Stamps


Other Ingredients
Distress Oxides in Twisted Citron, Squeezed Lemonade, Spun Sugar, Shaded Lavender and Tumbled Glass 
Copic Opaque White
Honey Doo Crafts Mica Powder
Kraft Cardstock