Tuesday 28 April 2020

Tuesday Tutorial - Whimsy Stamps...

Hello everyone,

These wonderful Tutorial Tuesdays come round quickly don't they!

I hope you are staying safe, well and in good spirits!

I'm here today with a tutorial to show you how to make a simple and colourful card with wonderful
goodies!

Ingredients from Whimsy Stamps
Other Ingredients
Watercolour Card
Black Stazon Ink
White Pen (I used a white water based Sharpie)
Kraft Card

Please follow this simple tutorial to see how I made my card...
Assemble the ingredients as shown.

This is a water colouring project.  I used Sparkle Pens but you can use which ever inks you have to hand, brush markers, ink pads, acrylics, pans, tubes - what ever - the list is endless!  The inks just need to respond well to being sprayed with water!
 
Dab a selection of blue/green inks on your work surface
...and spray with water.
Place a piece of watercolour card face down onto the inks and press down gently.
You should see something like this!  If you want to you can repeat spritzing and pressing the card down but I was happy with this so I didn't over do it!
Put the card to one side to dry.
Repeat the process outlined above with a selection of red and orange inks.
I was happy with this inky piece so again, I stopped spritzing and pressing!
With the Kinetic Wave die cut two pieces of the blue/green inky card.
With the largest circle die cut the red inky card and then die cut the blue wavy die cuts so that they match the circle and lay along the bottom of it.  Fix together.
Using the 13cm and the 11cm circle dies together die cut a piece of Kraft card to make a frame.
Fix the frame to the card design with foam tape as shown.
Stamp the boat from the Splash Clear Stamp Set with black Stazon ink, colour it with water colours and cut it out.  (There is no need to take too much time over this - the less you fuss with watercolours the better and to be honest, I think the background is the star of the show in this design)!
Fix the boat and the clouds to the background with foam tape and and stamp the little birds in black ink.

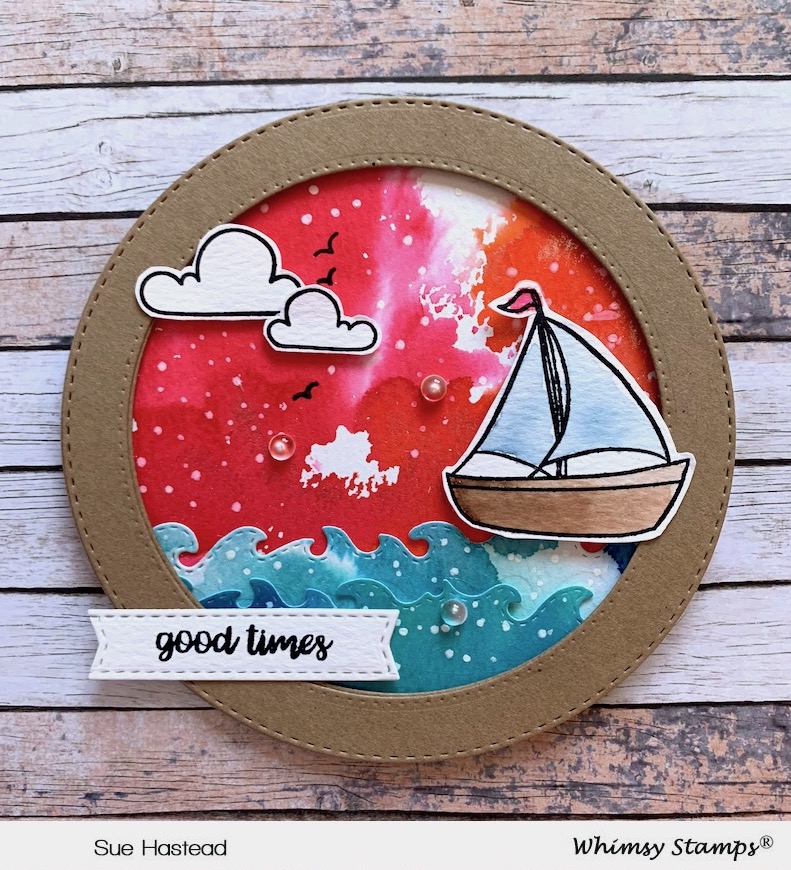
Die cut a piece of watercolour card with a Quick Strips Die and stamp the good times sentiment onto it.  Fix it to the card design as above.

Finish the design by adding some white dots with a white pen and some clear Sparkletz!
Thank you for popping by today!

Take care of yourselves and those you love!

Happy crafting
from Sue...xxx

Splash Clear Stamps - Whimsy Stamps Pierced and Stitched Circles Die Set - Whimsy Stamps Kinetic Straight Waves Die Set - Whimsy Stamps
Quick Strips Die Set - Whimsy Stamps Crafty Foam Tape White - Whimsy Stamps Sparkletz - Salt Water - Whimsy Stamps


Other Ingredients
Watercolour Card
Black Stazon Ink
White Pen (I used a white water based Sharpie)
Kraft Card


Please note that in order to assist with the running of this blog I do use affiliate links from time to time and there may be some in this post, denoted with a *.  I only work with products I love and my opinions are my own.
Please see my About Me page for more information.


Friday 24 April 2020

Whimsy Stamps, Fresh Friday - Calories Schmalories!...

Hello everyone,

I'm back again today with one of my favourite 
features

Fab Fresh Friday!

Every week, we'll be mixing up new goodies with a few oldies from the stash. 

This week, I'm playing with
Calories Schmalories Clear Stamps
Birthday Word and Shadow Die Set
Sprinkles Stencil
This cute cupcake from the
has been watercolored with Catherine Pooler Inks and mounted on an ink blended background embellished with the 

I have the created a circular card design, as shown, with 

I added the 
sentiment 
and used the happy sentiment from the 
Calories Schmalories Clear Stamps  set
die cut with a 
Quick Strips Die 

 Finally I added a few dots of Star Dust Stickles
Ingredients from Whimsy Stamps
Calories Schmalories Clear Stamps*
Birthday Word and Shadow Die Set*
Sprinkles Stencil*

Thank you for popping by today!

I hope you are all managing to stay safe and healthy in these uncertain times!

Happy Crafting

From Sue…xxx

Calories Schmalories Clear Stamps - Whimsy Stamps Sprinkles Stencil - Whimsy Stamps
Birthday Word and Shadow Die Set - Whimsy Stamps Pierced and Stitched Circles Die Set - Whimsy Stamps Quick Strips Die Set - Whimsy Stamps
 Crafty Foam Tape White - Whimsy Stamps


Please note that in order to assist with the running of this blog I do use affiliate links from time to time and there may be some in this post, denoted with a *.  I only work with products I love and my opinions are my own.
Please see my About Me page for more information.

Polka Dot Pals Mason - Whimsy Stamps New Release ...

Hello friends,

I hope today is kind to you and that you and those that you love are staying safe and well.

We have a wonderful
new release today featuring a gorgeous image by Barbara Sproatmeyer
The Polka Dot Pals range are such beautiful stamp sets, they come with a selection of images so you can make your own scene, and also have extra add ons so you can create the faces just how you want them! 

I loved making this card...

First I stamped 
in black ink onto card suitable for alcohol markers and coloured her with Copic Markers
Skin - E71, E11, E21, E51, E50
Eyes - E37, E35, E33
Hair - E47, E44, E42
Clothes - B28, B23, B21, C3, C1, C0, R85, R81

Then I cut her out and set her to one side while I created the background.

I want to say a big thank you for Mindy Baxter at My Creative Scoop for the background inspiration and the Distress Ink rainbow colour scheme.

I created the background by first blending Salty Ocean Distress Oxide ink over the top and bottom portions of the card leaving a gap for the rainbow.

Then I cut a template with a
and used it to create the rainbow by starting at the top and blending distress oxides in this order...
Worn Lipstick, Dried Marigold, Scattered Straw, Tumbled Glass, Evergreen Bough and Shaded Lilac.

I then die cut the sun and some clouds using one of my favourite die sets,

I stamped a sentiment from the retired Happy Sky Clear Stamp Set
on to one of the clouds and fixed it to the card as shown overlapping it with a vellum cloud and the sun.
I fixed the clouds and sun to the side of the card so they overlapped the edge and carefully trimmed them off afterwards.

I cut a piece of glitter card to create the ground and the fixed Mason to the design with

Finally I layered the design onto a piece of glitter card cut out with the 
(Wonderful Whimsy Stamps were the originators and innovators for this fabulous range of slimline dies)!

Finally I added some
I love this card - might have to make another! (:

Ingredients from Whimsy Stamps

Thank you for popping by today!

I hope you are all managing to stay safe and healthy in these uncertain times!

Happy Crafting

From Sue…xxx

*NEW Polka Dot Pals Mason Clear Stamps - Whimsy Stamps Pierced and Stitched Circles Die Set - Whimsy Stamps Up in the Clouds Die Set - Whimsy Stamps 
Slimline Waves Die - Whimsy Stamps Crafty Foam Tape White - Whimsy StampsSparkletz - Crystal Hearts - Whimsy Stamps


Please note that in order to assist with the running of this blog I do use affiliate links from time to time and there may be some in this post, denoted with a *.  I only work with products I love and my opinions are my own.
Please see my About Me page for more information.


Monday 20 April 2020

I'm here for you...

Hello friends,

I hope today is being kind to you!

I am here to day to show some of my favourite cards, I know these cards are not easy to make but we have some gorgeous products at
which really help!

Creating this gorgeous sunflower image could not be easier!

I used brush markers to paint the sunflower roughly where I wanted each colour to be placed.

Then I sprayed the stamp lightly with water and stamped the image into watercolour paper!

Simples!
To make this card I stamped the 
in the manner described above and cut it into a small square as shown.

Then I layered the image onto a smaller square and some
with some ribbon and sequins.

I stamped the sentiment from the 
along the bottom of the card design
To make this card, I again stamped the 
as I have previously described.

I die cut the image with the largest
and layered it onto an embossed and the design paper background.  
The paper is from the 
Giraffe 6 x 6 Paper Pack

Finally I added the sentiments from the 
along with some sequins - 

Ingredients from Whimsy Stamps

Thank you for popping by today!


I hope you are all managing to stay safe and healthy in these uncertain times!

Happy Crafting

From Sue…xxx


*NEW Sunflower Background Rubber Cling Stamp - Whimsy Stamps *NEW Sympathy Life Goes On Clear Stamps - Whimsy Stamps Notched Squares Die Set - Whimsy Stamps Shaker Maker Banner Die Set - Whimsy Stamps
 Sparkletz - Sailor's Sky - Whimsy Stamps

Please note that in order to assist with the running of this blog I do use affiliate links from time to time and there may be some in this post, denoted with a *.  I only work with products I love and my opinions are my own.
Please see my About Me page for more information.

Friday 17 April 2020

Spread joy not germs! Amazing international blog hop...

Hello everyone...

...and if it's your first time here - a big welcome!

I'm here today as part of probably the biggest blog hop ever and the theme is happiness and inspiring you to make cards!

We want to spread a whole lot of joy to those of you who are doing your bit by staying home and not spreading germs!

This hop has been put together by Catherine Pooler and Alexandra Stapleton-Smith to
spread joy not germs!
I have to admit I felt a bit nervous making my card!  We have over 150 hoppers and more than 30 sponsor companies which means there are some really amazing prizes to be won!
I have two prizes directly linked to my blog which are 
a $15 gift card to use at wonderful
Whimsy Stamps 
and 
a £20 gift card to use at our lovely
Dies To Die For
enormous thanks to Denise and Tracy for their generosity!
             Logo

The goodies I have used to make to make my card for today's hop are available from both of these fabulous stores!
Ingredients from Whimsy Stamps Dies To Die For
Other Ingredients
Water Colour Card
Water Colour Paints (I used Sparkle Pens by Crafter's Companion)
Card Suitable for Alcohol Markers 
Copic Markers - BV25, BV23, BV31, R20, N4, N2, N0
Wobbly Spring (Yes- the dolphin wobbles)!!!
Red Striped Design Paper
Twine
Now here's the important part so please read carefully...!

This hop runs from now until 24th April 2020.
The winners will be announced on April 27th on Catherine's and Alexander's blogs.

You can win a prize by commenting and there is also a treasure hunt with a few freebies and discount codes from some sponsors along the way so it's a good idea to visit as many blogs as you can!

You are currently 

To be in with a chance of winning a prize you need to leave me a comment and also tell me what your favourite Medical Drama is as I can't get enough of them - I LOVE a good medical drama - I have soooo many favourites but Grey's Anatomy is probably at the top of my list followed closely by Chicago Med and New Amsterdam (Dr Max though)!!! (;

Next you must hop to Shery's Blog at

Shery will show you some more gorgeousness and give you further instructions!

If you get lost you can find your way back by popping to 
or 
Enormous thanks to Catherine, Alexandra and Erika for their hard work putting this hop together - it can't have been easy with so many of us taking part - and enormous thanks to you for doing your bit in these strange times by staying at home!

Thank you for visiting - please follow me and come back sometime if you have nt been here before!
Look after yourself and those you love!
From Sue...xxx

There's a $15 voucher on offer at each of my lovely Whimsy Stamps teamies' blogs so be sure to visit them to have a look at their amazing cards and leave a comment.

Whale of a Time Clear Stamps - Whimsy Stamps Wonky Stitched Rectangles Die Set - Whimsy Stamps Pierced and Stitched Circles Die Set - Whimsy Stamps
Crafty Foam Tape White - Whimsy StampsSparkletz - Salt Water - Whimsy Stamps 


Please note that in order to assist with the running of this blog I do use affiliate links from time to time and there may be some in this post, denoted with a *.  I only work with products I love and my opinions are my own.
Please see my About Me page for more information.