Pages

Sunday, 15 October 2017

too cute to spook!...

Happy Sunday everyone...

I'm here today with something spoooooooky from Dies To Die For!
Although we don't really 'do' Halloween at home I do love making Halloween cards, especially with witches as cute as this one!
Ingredients (potions)! (-: from Dies To Die For
Pumpkin Die is similar to - Spellbinders - Pumpkin Accents
Other Ingredients
Make it Colour Blending Card by Elaine Hughes (Marker Geek)
Memento Ink Pad in Tuxedo Black
Copic Markers
Black Twine (or natural twine coloured with a black Copic marker)! o-:
K & Co Halloween sentiments
Craft Box Basics
Copics -
Skin - E50, E00, E11, E71
Hair - E33, E35, E29, Eues - YG03
Hat - BV29, BV25, BV23
Blouse - BV17, BV04, BV13, 
Pumpkins - E19, YR18, YR15, Y18
Thank you for popping by.
Happy Creating
love from Sue...xxx

Don't forget to pop straight to the Dies To Die For inspiration blog to look at the lovely DT creations there, and then straight to Dies To Die For for some essential retail therapy!

Monday, 9 October 2017

Furry reindeer...

Hello everyone,
Well - it's started and I've been colouring one of my favourite images - a reindeer! 
For a long time I avoided colouring furry animals because I wasn't confident about colouring their fur!  If you are feeling bit unsure about it as well then hopefully this tutorial will help.

Now, today I am going to be using a really strong Copic red combination so it is really important that my markers are clean.  (To be honest It's always important to have clean markers but with a deep colour like this even more so)!
I have chosen an image which I think shows off the technique to colour textured fur perfectly.  It is also quite beautiful - 
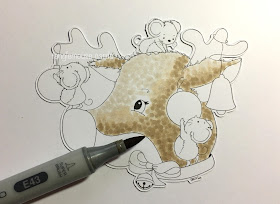
To colour textured fur I am basically going to make a lot of dots on the image with the brush nib of your marker.  It is important that the dots are randomly placed and of different sizes.
First I covered the whole of the image which would be textured fur with dots using E41...
...then I added dots of E42 where I wanted the darkest parts of my image to be...
and I went back over the whole area again with E41.
I then coloured the darkest areas again with E42
Next I used E43 to colour the darkest area...
...followed by E44.  (Don't panic - I know it is starting to look dark but adding the lighter colours shortly will even it all out)!
Next, I coloured with the same markers, in the same areas in reverse order...
E43
E42
E41 (all over)
To smooth out the area which goes from dark to light, I used a combination of E41 and colourless blender (but only use the colourless blender sparingly or you will end up with bald patches)!
Using the same markers, I carried on adding dots until the area was completely covered, the transition from dark to light looked 'smooth' and I had achieved a result I was happy with.
Using W00, W1, W3 and W4 I used the same technique to colour the fur on the mice.
Their ears are smoothly coloured with R11 and E81.
I finished colouring this lovely image with Copic markers as follows...
Bells - Y35, Y15, Y11
Bow, bauble and beautiful nose - R59, R56, R46, R24
Bauble - YG67, YG17, YG03
I really enjoyed colouring this cute reindeer - I do hope you found this tutorial useful.
Ingredients
Make it Colour Blending Card by Elaine Hughes (Marker Geek)
Copic Markers
Archival Ink pad in Cobalt Blue
 Blue Pearl and Glitter Card - Crafter's Companion

Thank you for popping by.
Happy Copic colouring
from Sue...xxx

Sunday, 1 October 2017

Birthday Hugs...

Hello everyone,
Wishing you a lovely Sunday.

I'm here with some gorgeousness from
The Ribbon Girl
and also a big thank you to Mary and Andrea for sticking with me during my little crafting break!

We have a new card challenge starting today at The Ribbon Girl
with some utterly fabulous prizes, 
follow the link
HERE
for all the details.
Ingredients from The Ribbon Girl
Lemoncraft Gossamer Blue 6 x 6 paper pad10mm Dorothy Ivory LaceNatural Button TwineLimoges Blue Seam BindingDaisy Flower Charm15mm Ivory AstersMiniature White Blossom10mm Blue Open Roses10mm Ivory Open RosesMini Glossy Accents
Other Ingredients
Stamping Bella Bunny Pile Stuffies (Dies To Die For)
Make It Colour Blending Card by Elaine Hughes (Marker Geek)
Memento Ink Pad in Tuxedo Black
Crafter's Companion Dersert Storm Kraft Card
Distress Ink Pad in Tumbled Glass
Lawn Fawn Lawn Cuts Cross Stitched Rectangle Stackables (Dies To Die For)
Lawn Fawn Lawn Cuts Stitched Rectangle Stackables (Dies To Die For)
My Favourite Things All About You Stamps (Dies To Die For)
MFT Die namics Label Tape (Dies To Die For)
Copics Used
Bunnies - E44, E41, E42, E44, W00, W1, W3, R04, R11, R02, R01 (plus Glossy Accents on their cute little noses)!
Flowers B02, B01, B00, Y15, Y04
Background - B00, B000
Grass - YG03, YG17, YG25, Colourless Blender 0


Thank you for visiting,
happy creating!
from Sue...xxx

...and remember to pop straight to
The Ribbon Girl
to look at the wonderful DT inspiration join in the challenge fun!
...and then straight to 
The Ribbon Girl Store
for some essential retail therapy!


You're doubly sweet...

Happy Sunday everyone and happy October 0-:

I have been on a bit of a break from crafting recently.

We've had a tricky summer as my eldest son had a motorcycle accident in July.
I'm happy to report he is fortunately well on the mend but frankly it has been a tough few months.

sooooo...

I have a few thank you's today...
to my lovely hubby and youngest son who have really kept the boat afloat at home,
to my eldest son's employer and friends who have rallied round to keep his spirits up
and to my darlin' friends who have given such love and support....  (you know who you are)!

The thank you's are n't quite complete today because I have few in respect of today's cards for wonderful 
Dies To Die For

Firstly to our Faye for her inspiration and patient support and feedback in respect of my no lines colouring,
secondly to our Elaine for her wonderful inspiration in respect of colouring backgrounds and grounding an image, and finally to our lovely Tracy for not giving up on me whilst I've had a little break!

I would never have had the confidence to colour these sweeties without the help of these lovely ladies!

phew - onto the crafting then!

Here's a double dose of Stamping Bella Sweetness!...
Ingredients from Dies To Die For
Papers - Maja Design - Summer Crush
Ingredients from Dies To Die For
Other Ingredients
Tonic Scalloped Rectangle layering Dies
Make it Colour Blending Card by Elaine Hughes (Marker Geek)
Memento Ink Pad in Tuxedo Black
Twine and Charm by The Ribbon Girl
Copics Used
Skin - E70, E21, E00, E000
Hair - E71, E74, E77
Frock - R04, R11, R20, R000
Underskirt - C00, C0, C1
Lily of the Valley - G99, G94, G82, C00, C0, C01
Background - G00, G000, spritzed with Colourless Blender 0
Ingredients from Dies To Die For

Other Ingredients
Tonic Scalloped Rectangle layering Dies
Make it Colour Blending Card by Elaine Hughes (Marker Geek)
Memento Ink Pad in Tuxedo Black
Twine and Charm by The Ribbon Girl
Copics Used
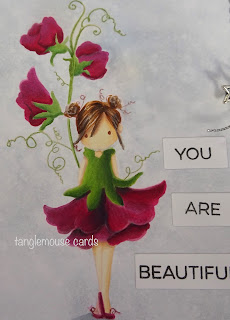
Skin - E70, E51, E50, YR30
Hair - E31, E34, E57, E76
Frock and Flowers - RV69, RV17, RV66, G46, G43, G82
Background - C2 spritzed with Colourless Blender 0

Thank you for popping by.
Happy Creating
love from Sue...xxx

Don't forget to pop straight to the Dies To Die For inspiration blog to look at the lovely DT creations there, and then straight to Dies To Die For for some essential retail therapy!